This post may contain affiliate links.
This DIY felt Christmas lights advent calendar might be one of my favorite handmade Christmas projects. Not only did my son come up with the fun idea to have a “lit-up” day marker, he also said, “this advent calendar can be used every year!” I made this DIY felt Christmas lights advent calendar to look like a string of Christmas lights hanging across a mantle. Each “light” is numbered and has a tiny pocket, just the right size for a little treat, note, or small items.
Get the free template below!
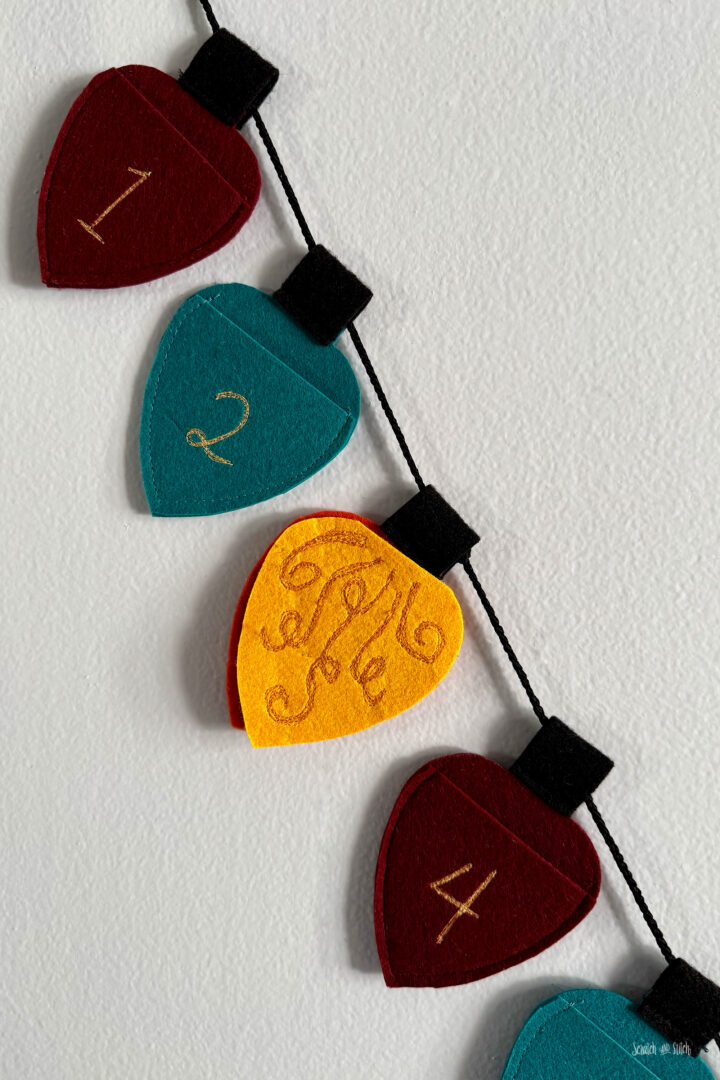
The sweetest detail came from my son when he suggested making a special yellow light so the current day looks like it is “turned on.” I added some stitched swirls to that light to make it feel like it is glowing. Every morning, he moves the yellow light to the next day. It is a simple, fun way to countdown to Christmas and is now part of our daily December routine.

This DIY felt Christmas lights advent calendar can be a no-sew project or a simple sewing project, depending on what you prefer. If you would like to make a no-sew felt advent calendar, I recommend using Gorilla Hot Glue because it bonds quickly and holds strong on felt. In this tutorial I will show you how to make your own DIY felt Christmas lights advent calendar using my free template for the lights, plus share ideas for adding the numbers and filling the pockets to mark each day.

DIY Felt Christmas Lights Advent Calendar
Project Details
This felt Christmas advent calendar is a garland made from felt ‘light bulbs’ numbered 1–25.
Each bulb has:
- A front with a stitched number
- A back piece to create a pocket
- A small rectangle that folds over the top to make a loop
All of the lights get strung onto rope, cord, or yarn to hang across a mantle, doorway, or wall.
Skill level: Beginner / Adventurous Beginner
Time to Complete: Weekend project or a few evenings
Pocket size: 3″ x 4″ – Perfect for small candies, tiny toys, or folded notes
Materials and Tools to Make a DIY Felt Christmas Lights Advent Calendar
This is a great scrap-buster felt project and a fun handmade Christmas craft.
Light Template:
Get the free template below!
Felt:
I recommend stiff felt for this felt Christmas advent calendar, but any type of felt will do.
- Stiff felt in multiple colors for the light bulbs (check out this multi-colored pack of felt sheets)
- Contrasting colored for the “lit” light
- More felt for the light tops
- Optional: Extra scraps if you want to make a different kind of day marker (like the elf or snowman shown here)
Stringing:
- Rope, cord, or yarn. Even bias tape will work. For a 25-day felt advent calendar, plan for at least 8 feet feet of cord.
Sewing:
- Thread for sewing
- Needle (a universal needle will work great for this)
- Fabric scissors
- Pins or clips
- Optional: free motion (or darning) presser foot for your machine
Glue
- I highly recommend using Gorilla Hot Glue for this felt project or any other of your craft projects. It’s seriously the BEST hot glue for a no-sew felt advent calendar.
Marking:
- Fabric marker, chalk pencil, or washable marker for drawing numbers
Optional extras:
- Embroidery floss for details

Download the free DIY felt Christmas lights advent calendar template here.
The free template includes:
- The light bulb and pocket shape
- The small rectangle for the fold-over loop
This template is for the felt Christmas light pockets only (elf and snowman not included).
Felt Christmas Lights Template
Enter your email to get the free pattern in your inbox.
By submitting your email address you will be added to the Scratch and Stitch email newsletter. You can opt-out at any time :)
How to Make a DIY Felt Christmas Lights Advent Calendar
- Download and print the template at 100%.
- Cut out the paper pieces.

Cut the Felt Christmas Light Pieces
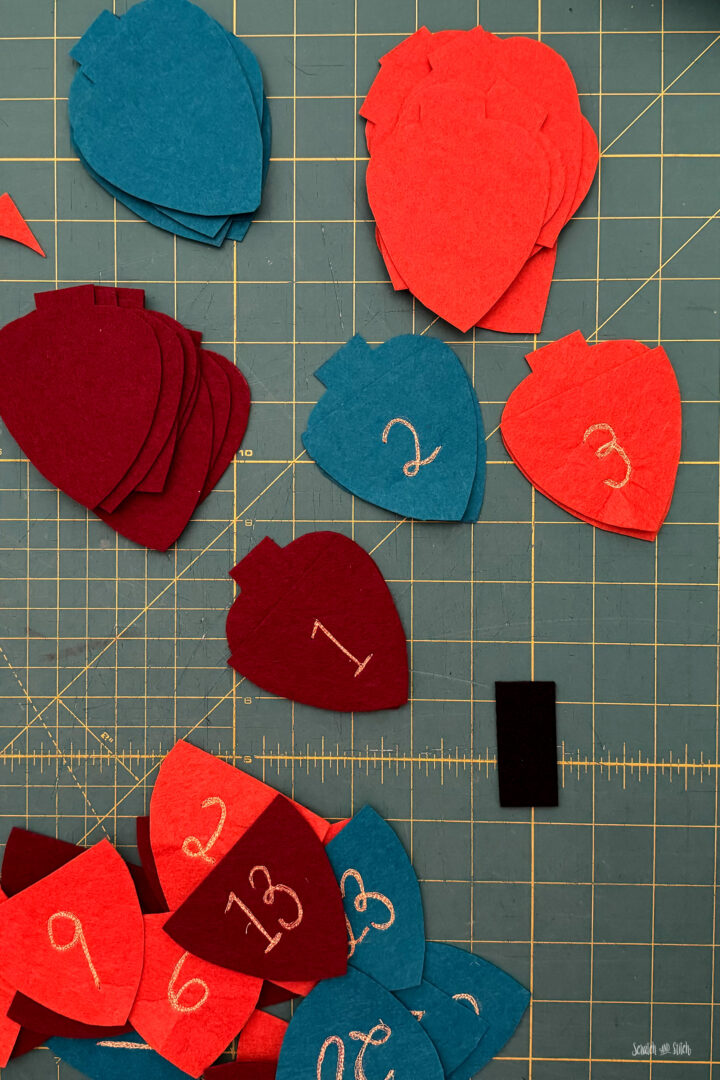
For each numbered pocket in your felt Christmas lights advent calendar, you’ll need:
- 1 light
- 1 pocket
- 1 rectangle for the loop
For a 25-day calendar:
- Cut 50 light bulb pieces total (two per number)
- Cut 25 rectangles
If you’re making a special yellow “lit” bulb, cut:
- 1 extra yellow bulb shape (cut off the top portion)

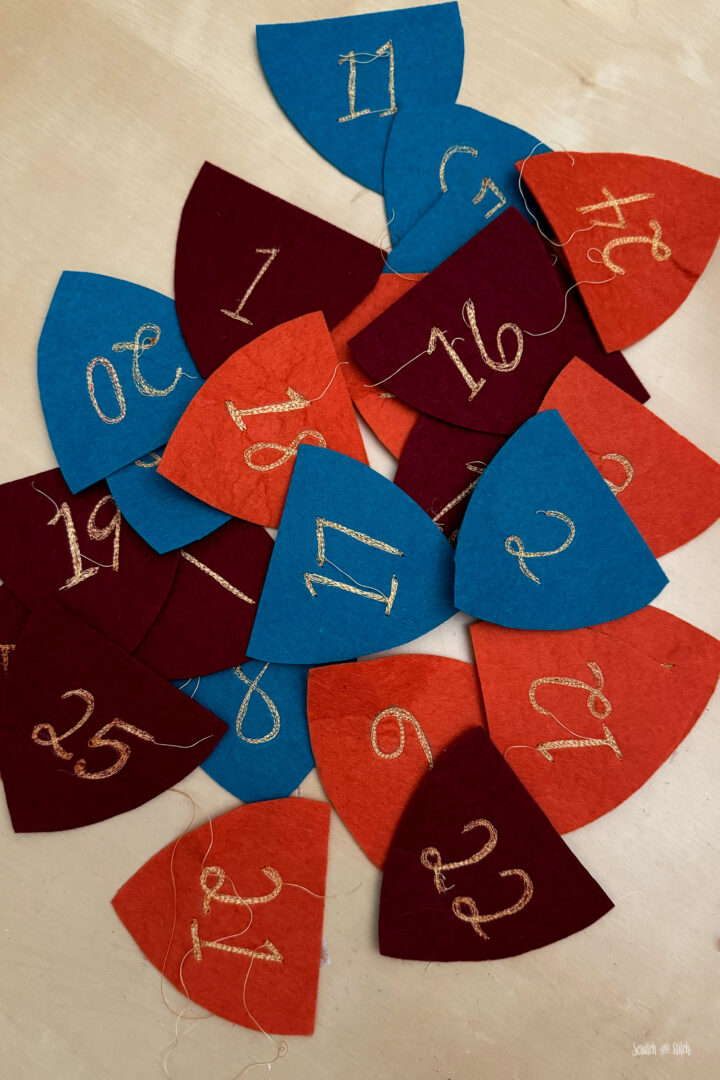
Add the Advent Calendar Numbers to Each Felt Light Pocket
Add the numbers onto the pocket pieces first whether you’re using the free-motion method shown here or another method (ideas below).
On our Felt Christmas Lights Advent Calendar, I chose to draw the numbers with a fabric marking pen onto the front of the Pocket pieces and then use my free-motion presser foot to “draw” the number. I used a gold colored thread in my bobbin and a yellow top thread that gave the numbers a unique look and texture. To create the thick line of the numbers, I went over the line several times to make the numbers really pop.

Free-motion stitching Numbers:
- Set up your machine for free-motion presser foot and feed dogs according to your machine’s manual.
- Carefully stitch over your drawn number, “writing” with the needle as you move the felt.
Your numbers do not need to be perfect. The wobbly, hand-drawn look gives the calendar charm and makes each light feel unique.
If not free-motion, here are some other creative ideas for adding day numbers:
- Hand embroider the numbers
- Cut felt numbers and sew (or glue) them on
- Use fabric paint or a permanent fabric pen
- Use fabric puff paint or glitter paint
- Glue wood numbers onto the felt Christmas lights
- Cut out numbers from the pockets and layer a contrasting colors behind

Plush Christmas Tree Pillow Sewing Pattern
Make a plush Christmas tree shaped pillow with decorations. Makes a great gift (especially for houses with young kids) or decoration!
Assemble the Felt Pockets
Once the numbers are in place on the pocket pieces, it’s time to turn each one into an actual pocket.
- Place the numbered pocket on top of a matching colored light so the bottom point and edges align. Clip or pin to hold.

If sewing:
- Starting and stopping with a backstitch, sew just along the edge (about 1/8″ seam allowance) at a top corner near the top side and sew around the curve of the bulb, leaving the top edge open
If glueing:
- Add a bead of glue onto the backside of the pocket with number just along the edges of the sides.
- Place the pocket on top of the matching light.
- Allow glue to set and dry.
Repeat for all 25 lights.
/
MORE CHRISTMAS: Make a 3D Christmas Tree Ornament – free template and tutorial!

Sew the Fold-Over Loops
The small rectangles become loops for each of the felt lights along the hanging cord.
For each light:
- Fold the loop rectangle in half.
- Place the loop over the top center of the light so the bottom edge is aligned with the top edge of the light. Pin or clip to hold.
- Sew (or glue) along the bottom of the loop to attach to the top of the light.
- Repeat with all lights.

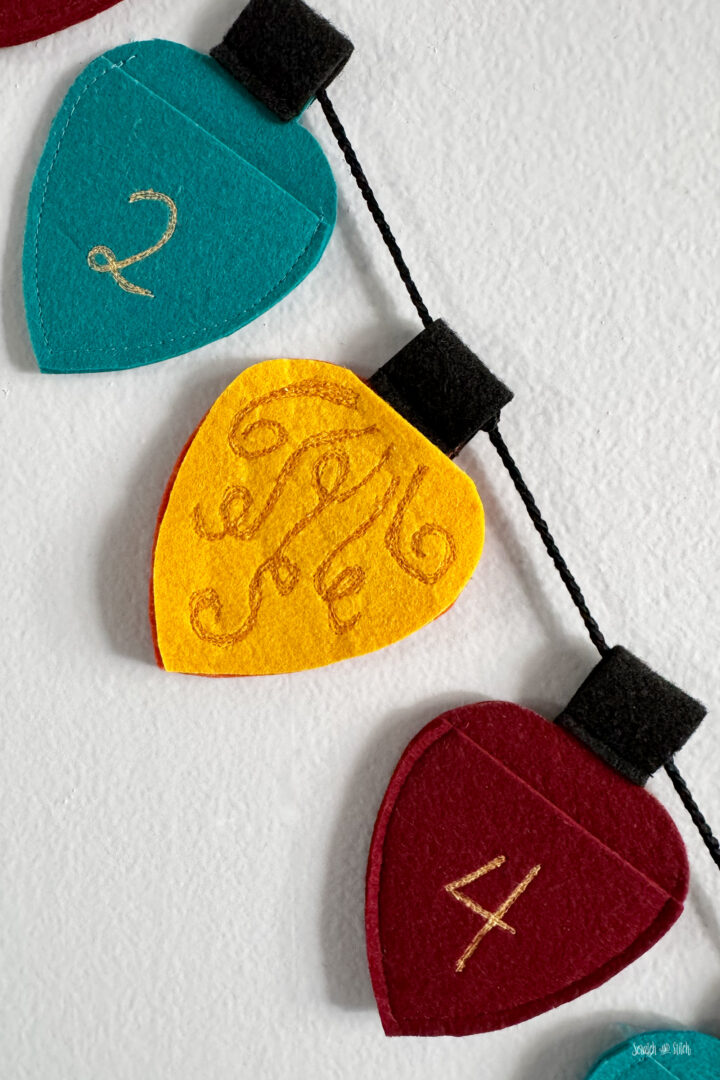
The “Lit” Light Day Marker
The moving yellow light day marker is the little detail that makes this felt Christmas advent calendar extra fun to use.
For the yellow, current day “lit” light, I drew random swirls onto the yellow light and free-motion stitched those with gold thread. Onto the backside, I placed a rectangle piece with a point that slides into the pocket. This can be sewn on or glued to the back.
To make the yellow light:
- Cut one yellow light using the same light template except eliminate the extra piece at the top of the light.
- Optional: Add stitched swirls or radiating lines to the front to help it look like it’s glowing.
- Add the extra felt piece to the backside and sew or glue to hold. This part will slip into the light pocket to hold in place.
String the Lights
The last step is to string the felt lights onto the cord to create your full felt Christmas lights advent calendar garland.
- It’s best to add all the lights onto the cord, then determine how long you want your cord to be. The spacing between each light and how much cord is left at each end will determine the final length.
- Slide each light onto the cord through its loop, arranging them in order from 1 to 25.
Options:
- Keep them close together for a full, clustered look
- Space them out for a longer garland
- Split them into two shorter strands (1–12 and 13–25, for example)

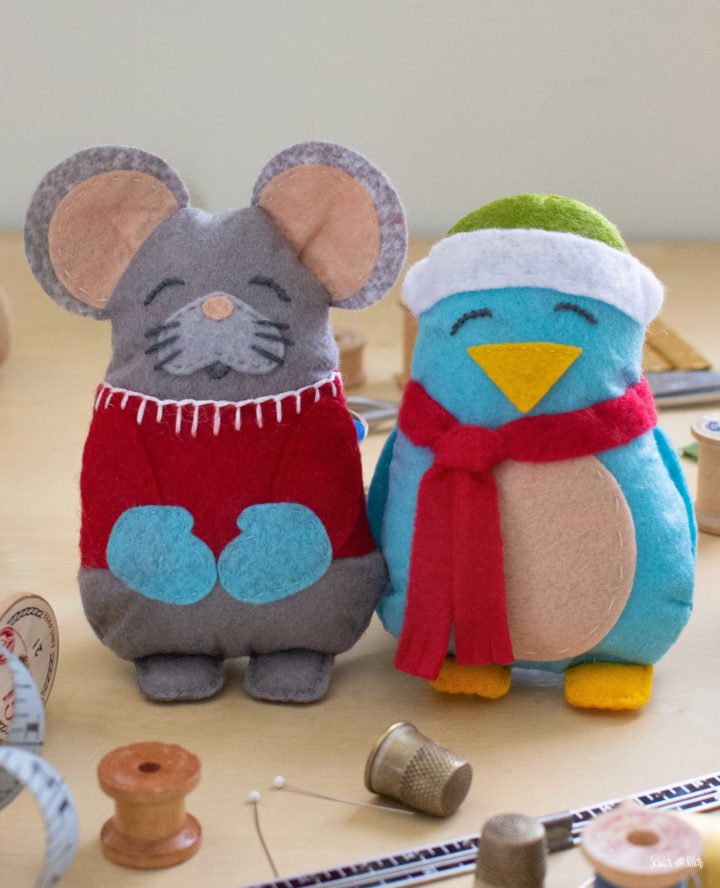
Pocket-Size Bird and Mouse Plushies
Make a cute pair of winter themed, pocket-sized plushies with this free template and tutorial.
Other Ways to Mark the Day on the Felt Advent Calendar
If you’d like an alternative to the yellow light, or an extra friend to move along the strand, you can create a small character from felt scraps to move along your felt advent calendar day by day.. There’s no template for these characters. I’m including them as inspiration so you can sketch your own shapes and have fun with felt scraps.
Snowman and Elf
- Snowman: stacked circles, a scarf, tiny carrot nose, and stitched eyes
- Elf: a simple t-shirt body shape, two hands, circle head, circle nose, stocking hat with long tail and a puff ball at the end.
Each of the characters slip into the pocket of each day in the DIY Felt Advent Calendar.

What to Put in a Felt Advent Calendar
Many DIY advent calendars, including this felt Christmas lights advent calendar, are filled with tiny treats to enjoy during each day of the countdown to Christmas. The small pockets in the lights are the perfect size for a small chocolate, mint, or stick of gum. Or fill with small trinkets or fidgets for kids to find each day.
Ideas for filling:
- Small wrapped candies or chocolates
- Mini toys: erasers, stickers, little figures, beads
- Craft supplies: buttons, washi tape, special thread
- Activity notes, such as:
- “Bake cookies tonight”
- “Christmas light tour”
- “Read a holiday story before bed”
- “Hot cocoa and movie night”
- “Make a paper snowflake”

Make This DIY Felt Christmas Lights Advent Calendar in Your Own Style
This project is easy to tweak so it fits your style and your home.
Color palette:
- Classic red, green, and white
- Rainbow lights across the whole garland
- Neutral and soft tones for a calmer look
- Sparkly or metallic felt for extra shine
Number of days:
- Traditional 1–25
- 1–24 if that’s your family’s usual countdown
- 12 days of Christmas version
- A custom start date that works with your holiday schedule
Materials:
- Use new felt sheets or try upcycled textiles for a totally unique felt advent calendar.
Extra details:
- Add decorative stitching to some bulbs with your machine or a blanket stitch sewn by hand.
- Add a tiny felt banner above your garland with a phrase,your family name, or “Countdown to Christmas.”
- Mix in shaped pieces (stars, trees, etc.) between the bulbs

The Countdown to Christmas Begins!
This felt Christmas lights advent calendar is one of those projects that doesn’t just decorate your home, it becomes part of your family’s December routine. The pockets give you a spot for tiny surprises, and the moving yellow light (or whatever your chose) gives kids a daily job they look forward to. If you’re looking for a DIY felt advent calendar you can reuse year after year, this one is simple to make, easy to store, and so fun for kids.
I hope you enjoy making and using this Felt Advent Calendar as much as we do!
Save this DIY felt Christmas lights advent calendar for later.
Pin this project to your Handmade Holiday or DIY Felt Project boards.

Share Your Makes
If you make this project or any other Scratch and Stitch inspired project, tag @scratchandstitch or #scratchandstitch on your social pages or send me an email here.
Leave a Reply