This post may contain affiliate links.
Every year, my son gets to choose our family Halloween costumes, and every year we make them ourselves. It’s become one of my favorite Halloween traditions. He comes up with the theme, we figure out how on earth we’re going to turn his ideas into wearable costumes, and then we get to work making everyone’s costume by hand.
For Halloween 2025, he chose My Singing Monsters, and we got to work!
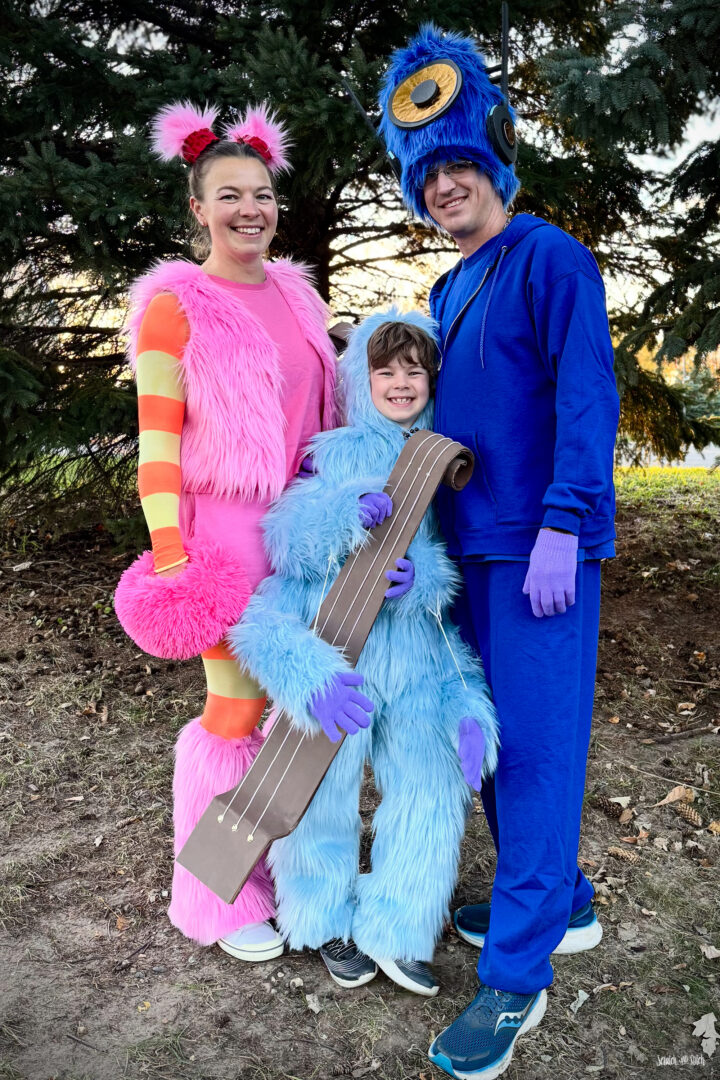
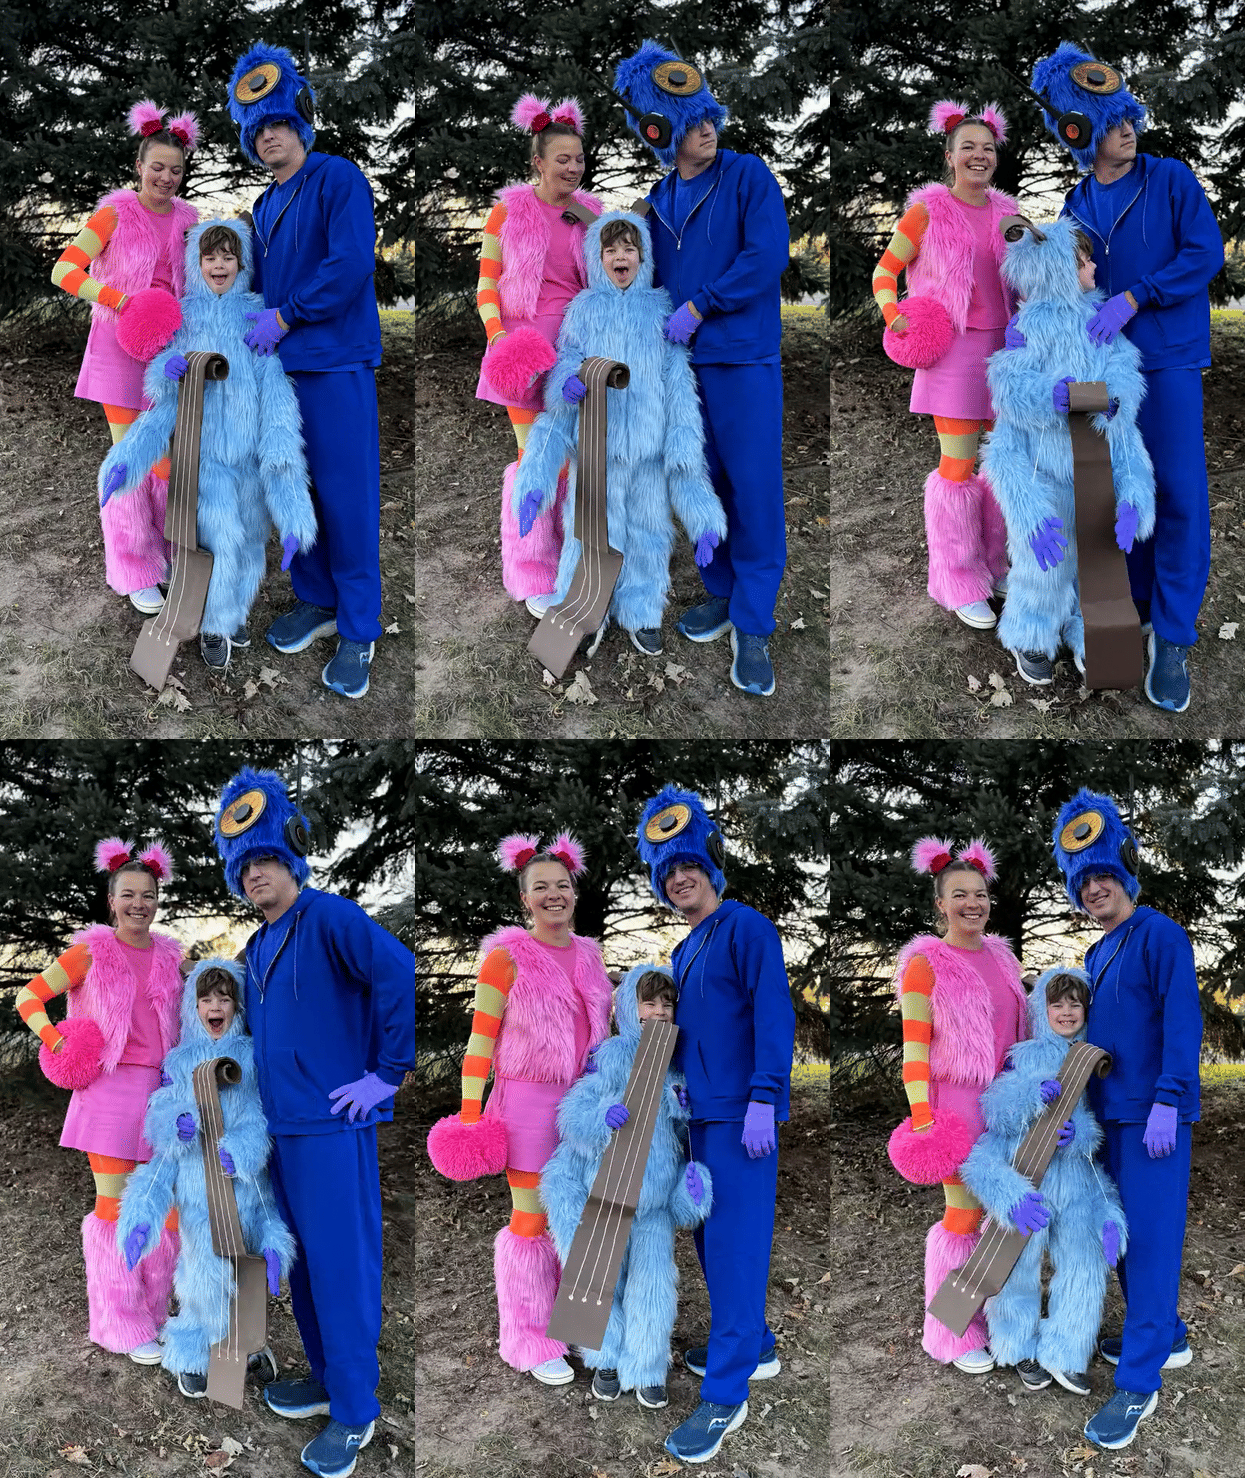
After much debate, we each chose our favorite monster to dress up as: Bowgart, PomPom, and Rare Deedge, complete with extra arms, giant pom-poms, monster fur, headphones, speakers, and even a monster-sized cello.
Even better, my son’s Bowgart costume went on to win Runner-Up in the official 2025 My Singing Monsters Spooktacle Costume Contest! A award that
I didn’t document every single step as we worked, so this isn’t a traditional step-by-step costume tutorial. But I did take some process photos, and I can break down the materials we used, how we constructed the major pieces, and some of the trial and error that went into turning three animated monsters into our DIY My Singing Monsters family Halloween costumes.

We live in Minnesota, so the weather is always a big consideration when we make our family Halloween costumes. It could be surprisingly warm, freezing cold, or even snowing. Our costumes need to work in all kinds of weather and, most importantly, leave enough room to layer up underneath without covering the costume. Warm Halloween costumes are important around here!
DIY Bowgart Costume
My son chose Bowgart, the four-armed, cello-playing monster covered in light blue fur. That meant his costume needed a few very recognizable features: four arms, curled cello-inspired horns, and, of course, Bowgart’s oversized string instrument.
Bowgart plays a cello in My Singing Monsters, using all four arms as part of his performance. Having the cello prop was essential to making the costume instantly recognizable, but it also needed to be lightweight enough for a kid to carry around on Halloween without eventually handing it off to PomPom or Rare Deedge!

Materials We Used for the Bowgart Costume
Here’s a list of the materials and supplies we used to make the DIY Bowgart costume:
- faux fur in Baby Blue from FabricLA
- old bed sheet for lining the top and pants
- zipper
- thin white elastic for attaching the second pair of arms
- light purple knit gloves
- Poly-Fil for stuffing the second pair of arms
- brown self-adhesive craft foam for the horns, cello, and bows
- black cocktail straws and black pony beads for the tuning pegs
- cardboard for the basic cello shape
- string for the cello strings
- 1-inch-wide elastic for the pants
- Gorilla Glue hot glue sticks, the only hot glue I use because it’s the boss of hot glue
- thumbtacks
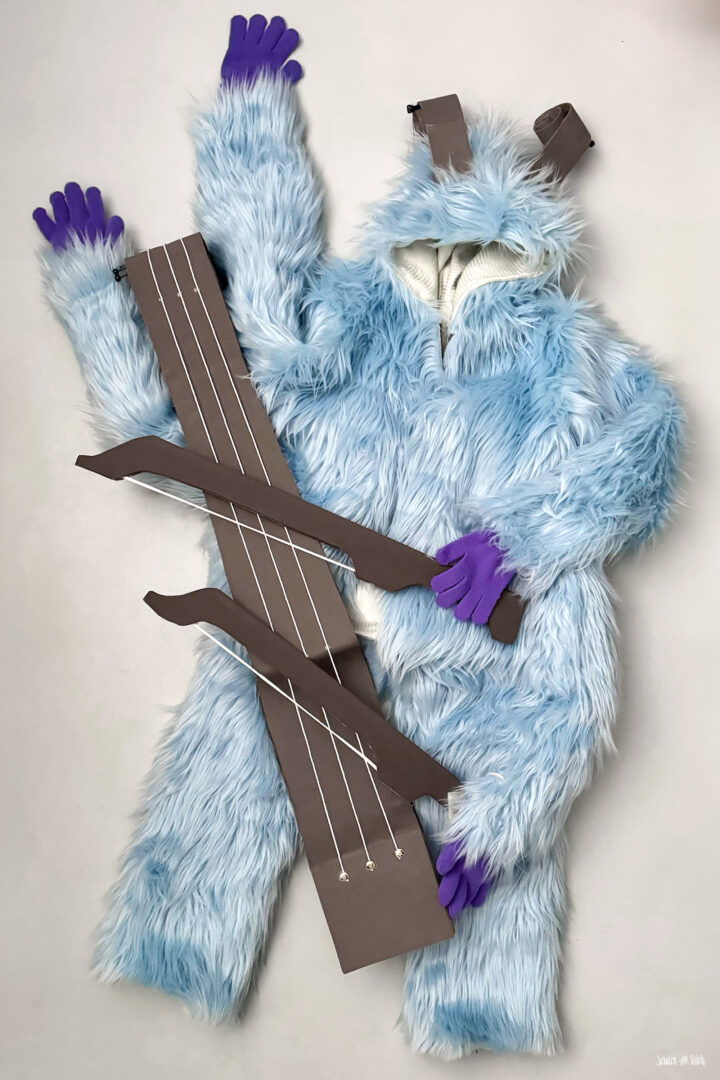
Making Bowgart’s Furry Body
For the Bowgart costume, we decided a separate top and bottom would work best, especially since wearing faux fur all day can get hot.
Bowgart’s Furry Pants and Top
I used a pair of my son’s loosest-fitting pajama pants and an oversized hoodie to trace and create paper sewing patterns for both the top and bottom. I cut the pieces from the faux fur fabric, leaving plenty of extra seam allowance just in case we needed more room.
I also cut mirrored versions of the top and bottom pieces from an old bed sheet to use as lining. The backing of faux fur can be scratchy and uncomfortable against the skin, so adding a lightweight lining made the costume much more wearable.
Using my serger, which I rarely ever use, I sewed together the pieces for the top, including the sleeves, front, back, and hood. I repeated the process with the lining pieces and then assembled the pants.
At this point, we could try everything on and make sure the fit was right. We were going for a loose, baggy fit that gave him plenty of room to move.
Once we confirmed that everything fit and he could easily maneuver in the furry pieces, I joined the lining and faux fur layers with right sides facing and serged around the perimeter, leaving the front open for the zipper.
After a few adjustments to the height and sleeve length, we were good to go. I hand-stitched the zipper in place.
For the pants, we repeated a similar process with the fur and lining layers. I added a waistband channel and threaded 1-inch elastic through it to hold the pants comfortably on his hips. After a few adjustments to the length, we finally had the fit just right.
Adding Bowgart’s Extra Arms
Bowgart wouldn’t be Bowgart without four arms!
For the extra set, I cut two more faux fur arm pieces. We lightly stuffed the arms and one pair of gloves with Poly-Fil, then hand-sewed the gloves to the arms.
I hand-sewed the extra arms underneath the real sleeves to hold them in place. Next, we attached a short piece of elastic between each fake arm and real arm. The elastic kept the extra arms moving along with his real arms but could easily be detached when needed.
Underneath the furry top and pants, my son wore a lightweight T-shirt and shorts so he could take off the faux fur layers during the school day if he got too warm.
Making Bowgart’s Cello Scroll Horns
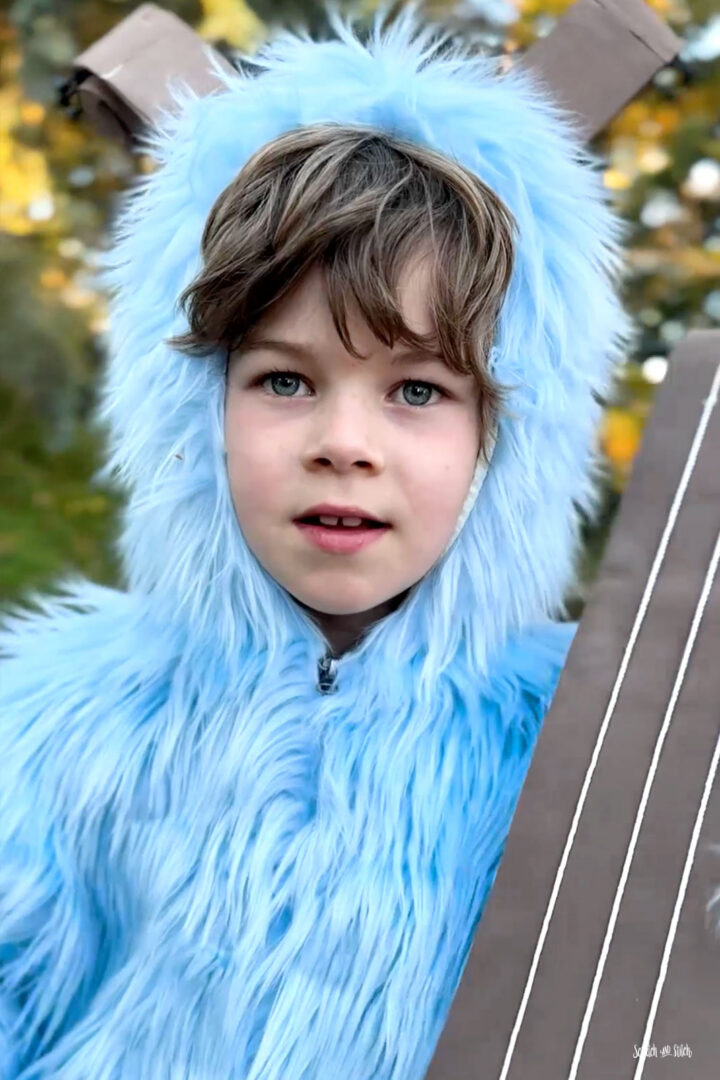
To make Bowgart’s cello-inspired horns, I cut two wide strips of cardboard and covered both sides with brown self-adhesive craft foam.
I curled one end of each horn tightly and clipped it in place for a few days so the cardboard and foam would retain the curved shape.
For the little tuning pegs, we hot-glued black pony beads onto the ends of black cocktail straws and then glued those pieces onto the curled ends of the horns.
To attach the horns to Bowgart’s hood, my son put on the top with the hood up so we could get the placement right. Using embroidery thread, I stitched the horns securely to the hood, making sure they stood upright as intended while still allowing us to remove them later.
Building Bowgart’s Cello
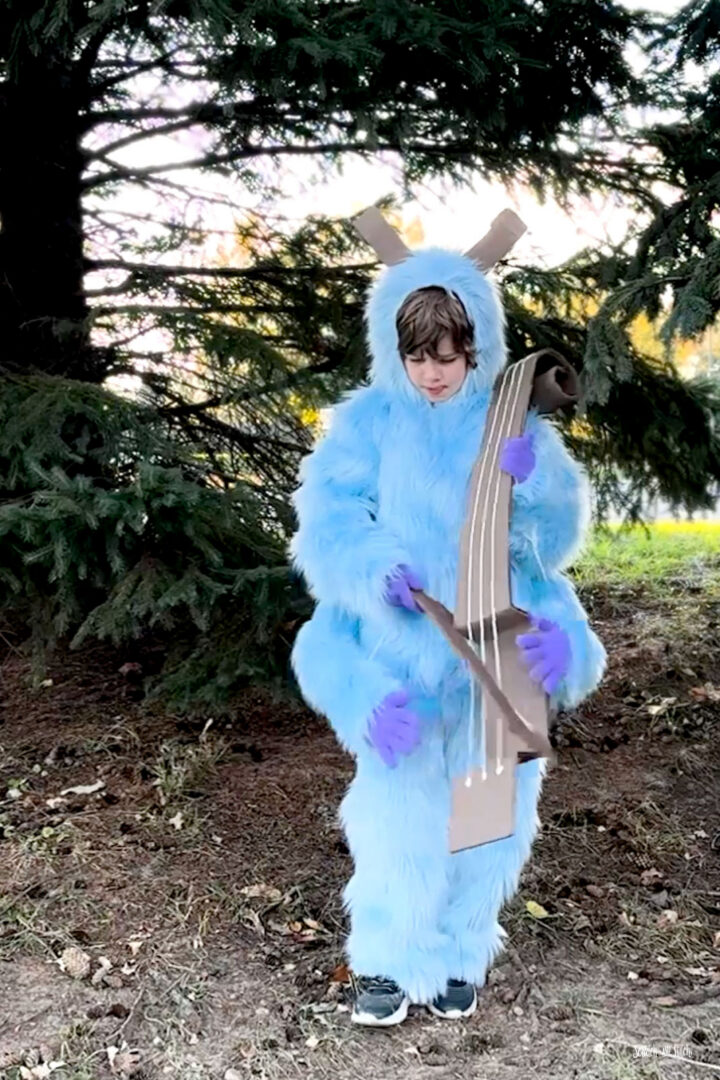
A Bowgart costume wouldn’t really be Bowgart without the instrument. We needed to make a cello that was oversized enough to look right with the costume but lightweight enough for a kid to carry around on Halloween.
To create the cello, we cut a long piece of cardboard and covered it with self-adhesive craft foam while forming the basic cello shape.
We placed four lengths of string down the cello and used hot-glued thumbtacks to hold them in place. The thumbtacks also helped the curved cardboard retain its shape.
We created the two cello bows using more cardboard, craft foam, and string.
RELATED: The cutest DIY Kids Lion Costume with tail and paws →
A Contest-Winning Bowgart Costume
After Halloween, we entered my son’s Bowgart costume in the official 2025 My Singing Monsters Spooktacle Costume Contest.
His handmade Bowgart costume ended up winning Runner-Up in the Costume Contest!
DIY PomPom Costume
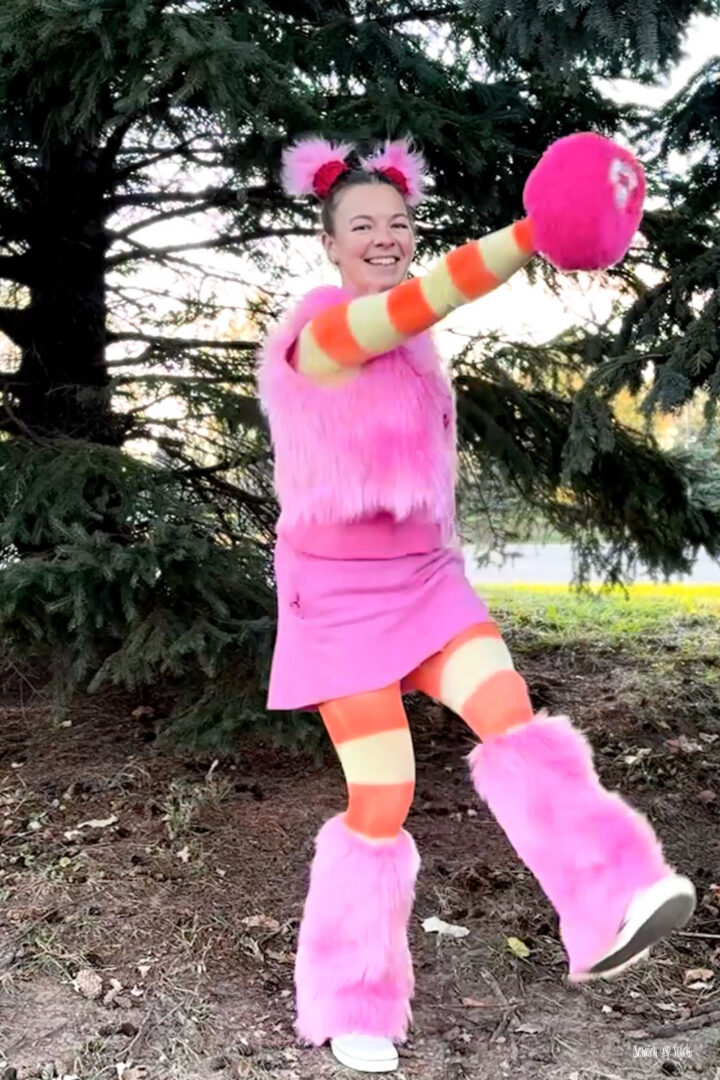
For my costume, I went with PomPom, which is basically an excuse to cover yourself in pink fluff and giant pom-poms.
The details I really wanted to capture were her huge signature pom-pom hands, fluffy hair poms, striped arms and legs, and all that bright pink fur around her body and lower legs.
Materials We Used for the PomPom Costume
- bubblegum pink faux fur from FabricLA
- 2 pairs of yellow tights
- orange Tulip Fabric Spray Paint
- painter’s tape
- cardboard
- fuzzy pink pillowcase (or other style of furry fabric)
- scrap fabric
- Poly-Fil
- pink Rit Dye
- T-shirt and skirt pieces reused from last year’s Winged Pikmin costume
- red scrap fabric
- 1″ wide elastic
- pink knit gloves
Making the PomPom Costume Parts
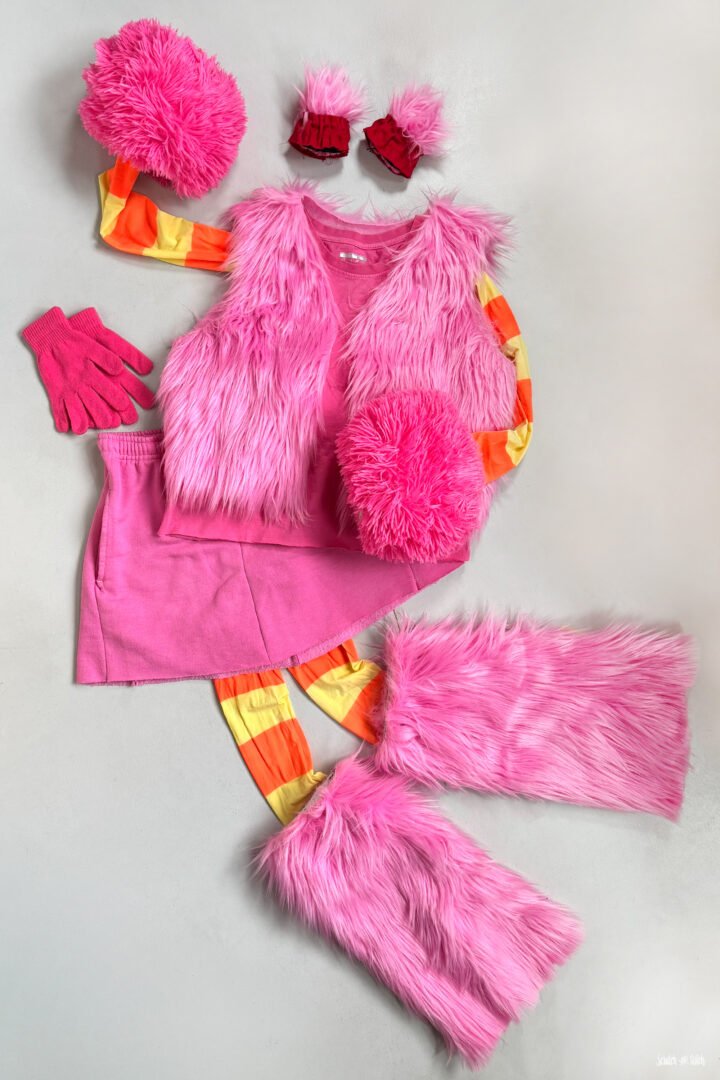
Faux fur, dyed tights, reused clothing, and a few newly made pieces brought this PomPom costume together surprisingly easily.
Pink Top and Skirt
The pink top and skirt were actually upcycled from my Winged Pikmin costume from the previous Halloween, which itself reused pieces from an earlier Garten of Banban Banbaleena costume. Apparently these pieces have become part of an ongoing Halloween costume evolution!
The already-pink T-shirt just needed the sleeves cut off and the shirt cropped slightly.
The previously dyed sweatpants were easily converted into a skirt by cutting off the legs, opening the crotch seam, and sewing everything back together into a simple pencil skirt.
The best part? The skirt kept the original pockets!
PomPom’s Striped Arms and Legs
To create PomPom’s orange stripes, I cut leg-shaped pieces of cardboard and slid them inside the tights. Using painter’s tape, I masked off the wide stripes and sprayed the exposed areas with orange Tulip Fabric Spray Paint.
I applied a couple of layers, letting them dry in between, then flipped everything over and sprayed the other side.
The stripes didn’t come out perfectly, but they definitely did the job.
For the arms, I cut the crotch area out of one pair of tights so I could slide the tights over my head and down my arms. The second pair was worn normally on my legs.
Making the Furry PomPom Vest
Using the pink faux fur and a hoodie as a template, I traced and cut one back panel and two front panels for the vest.
The three pieces only needed to be sewn together at the shoulders and sides.
Since the vest was going to be worn over several other layers, I didn’t add a lining. If I made this costume again, though, I would definitely line the faux fur vest to make it more comfortable.
DIY Pink Leg Fluffies
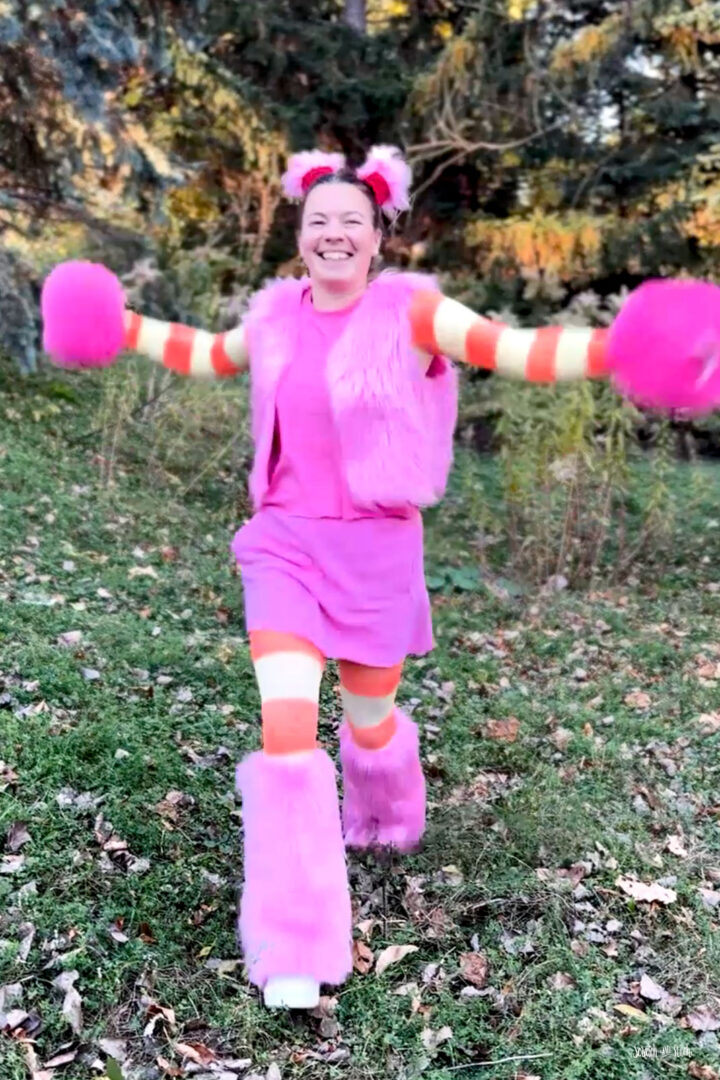
PomPom’s furry leg warmers, or “leg fluffies,” are surprisingly easy to make with pink faux fur and 1-inch elastic.
Measure around your leg directly below the knee, then measure from below the knee to the floor.
On the wrong side of the faux fur, mark a rectangle using your knee measurement plus about 1 inch for width and your knee-to-floor measurement for height. Add about 3 inches of width toward the bottom edge to give the leg fluffy a slight bell shape.
Sew the fur into a tube and add elastic around the top to hold it in place.
Pro tip: Trim some of the extra-long fur around the bottom so it doesn’t drag on the ground while you’re walking.
Making PomPom’s Hair Poms
The hair poms are basically scrunchies with faux fur attached to one side.
Using scrap red fabric, I created a 2-inch-wide fabric tube, slid 1-inch elastic through it, and sewed the ends together to create a scrunchie. I then added a piece of pink faux fur to one side.
I put my hair into two space buns, slipped the furry scrunchies over them, and added a few pins to keep everything in place.
Making the Giant Pom-Pom Hands
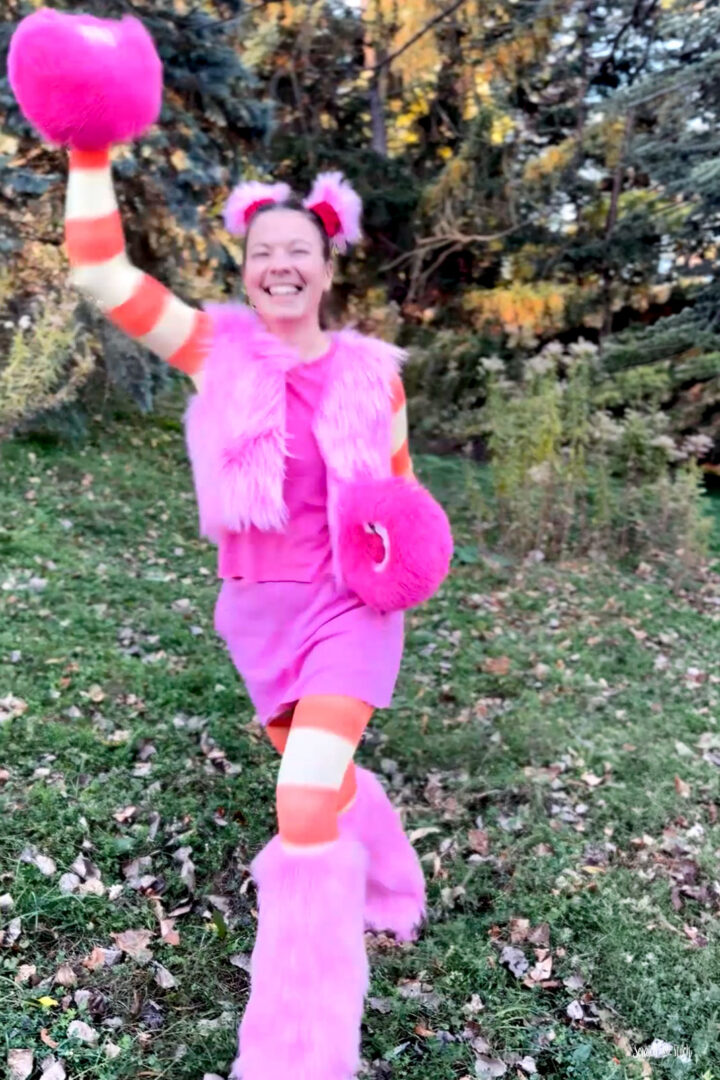
Making PomPom’s giant pom-poms was probably the most challenging part of my costume, but they were still surprisingly easy to construct.
I wanted the pom-poms to look oversized while still letting me use my hands. Instead of making solid pom-poms, I basically created giant fuzzy donuts that could be worn around my wrists like bracelets.
I cut two long rectangles from a slightly stretchy pink furry pillow cover and two matching rectangles from scrap fabric.
With right sides together, I sewed along the long edges. I turned the pieces right side out, joined the furry ends together to create loops, and lightly stuffed them with Poly-Fil.
I closed the remaining openings with a ladder stitch.
The oversized pom-poms slid over my hands and sat around my wrists, leaving my actual hands free. A pair of pink knit gloves finished off the look.
The last thing I needed to complete my PomPom costume was to learn a few of her dance moves!

DIY Rare Deedge Costume
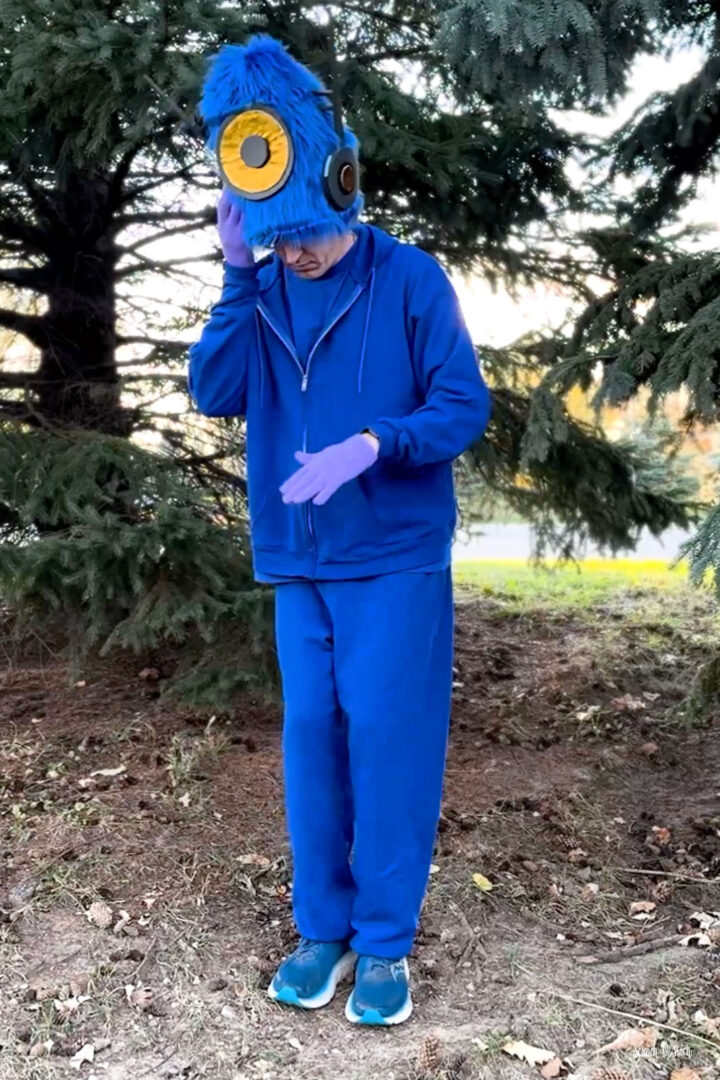
Dad became Rare Deedge, and to keep all three My Singing Monsters costumes visually cohesive, we used royal blue faux fur along with craft foam and felt to create his character details.
Rare Deedge has a deeper blue color than the standard Deedge, along with oversized headphones, gold accents, and an unmistakable speaker built right into the middle of his forehead.
Materials We Used for the Rare Deedge Costume
- royal blue faux fur from FabricLA
- Poly-Fil
- black craft foam
- gold craft felt
- scrap light blue felt
- hot glue
- scrap fabric
- blue zip-up hoodie
- blue sweatpants
- light purple knit gloves

Making the Rare Deedge Costume Base
The base of Dad’s DIY Rare Deedge costume was a simple royal blue zip-up hoodie with matching sweatpants.
These were purchased new, but because we didn’t permanently alter them, they can still be worn as everyday clothes or reused as the base for another DIY Halloween costume.
We paired the sweatsuit with simple light purple knit gloves and blue shoes.
Building Rare Deedge’s Headpiece, Speaker, and Headphones
The goal with the Rare Deedge headpiece was to create a lightweight form that could be worn comfortably like a hat.
I started by cutting two rectangles with rounded tops from the royal blue faux fur. I placed them right sides together and sewed around the sides and curved top, leaving the bottom open.
Next, I cut a circle of scrap fabric to fit inside the headpiece and tested it on Dad’s head.
Once we were happy with the fit, I lightly stuffed the space between the faux fur and scrap fabric with Poly-Fil, then hand-sewed the two layers together around the bottom. This took a few adjustments, but eventually we got the shape and fit right.
To make Rare Deedge’s forehead speaker and headphones, we cut circles from black craft foam and gold craft felt and layered the pieces to resemble the details on the character, all secured together with Gorilla Glue.
We added tall, narrow triangles to the headphones to recreate the antenna-like details extending from the top.
A few DJ moves completed the Rare Deedge look!
Bringing Our My Singing Monsters Family Costumes to Life
Over the last few years, we’ve had almost as much fun making videos of our costumes as we have making the costumes themselves, choreographed by my son, of course.
Enjoy our DIY My Singing Monsters family Halloween costume video featuring Bowgart, PomPom, and Rare Deedge!
Making Your Own My Singing Monsters Costume
I hope our homemade costumes give you a few ideas if you’re planning your own DIY My Singing Monsters costume.
You don’t necessarily need a full sewing pattern or exact instructions to turn one of these animated characters into a wearable costume. Start with the monster’s most recognizable features, figure out which pieces can be made from clothing you already own, and build the important character details from there.
Making our family Halloween costumes together has become one of the highlights of Halloween every year, and we love sharing the process, finished costumes, and all the creative problem-solving along the way.
If you make your own Bowgart, PomPom, Rare Deedge, or another My Singing Monsters costume, I’d love to see it! Send pics or tag @scratchandstitch on your socials.