This post may contain affiliate links.
Carry the essentials in a DIY leather wristlet. Make a simple leather wristlet clutch using one piece of 12″ x 12″ leather. It’s perfect for date night to carry the essentials.

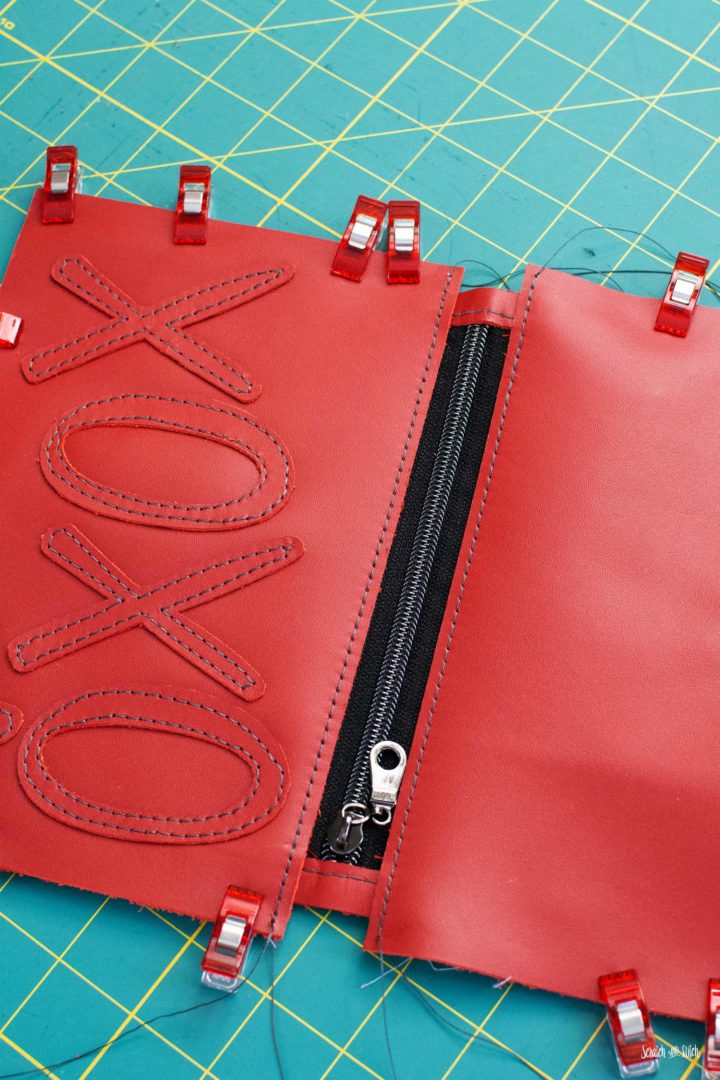
The wristlet features XOXO letters, two hearts, raw edges, and exposed stitching. The inside includes a zipper pocket and a slip pocket. The wristlet hangs from a removable clip-on loop for hanging on.

Materials and Tools
- XOXO and hearts template or cut files (download below)
- paper placement template (included in pattern files)
- 12″ x 12″ piece of leather (Cricut Leather or 2oz to 4oz leather)
- 1/4 yard or a fat quarter quilting cotton (I recommend fusing interfacing prior to cutting to avoid any shrinkage)
- light-medium weight fusible interfacing (i.e. Pellon SF101)
- 8″ #5 handbag zipper
- 7″ #3 zipper
- 1/2″ D ring
- 1/2″ swivel clasp
- 2 metal rivets
- leather hole punch
- rivet press or rivet setting tools
- heavyweight thread (exterior)
- standard thread (interior, optional)
- sewing clips
- sewing pins
- leather glue (fabric glue will also work)
- double-sided tape (for use with sewing)
- fabric pen
- iron/press mat
- ruler
- bag tag(s) optional
By submitting your email address you will be added to the Scratch and Stitch email newsletter. You can opt-out at any time :)
How to Make the XOXO Leather Wristlet Video
Here’s a video that includes all of the steps for making the leather wristlet. Refer back to this page for the full list of materials, tools, measurements, and detailed instructions.
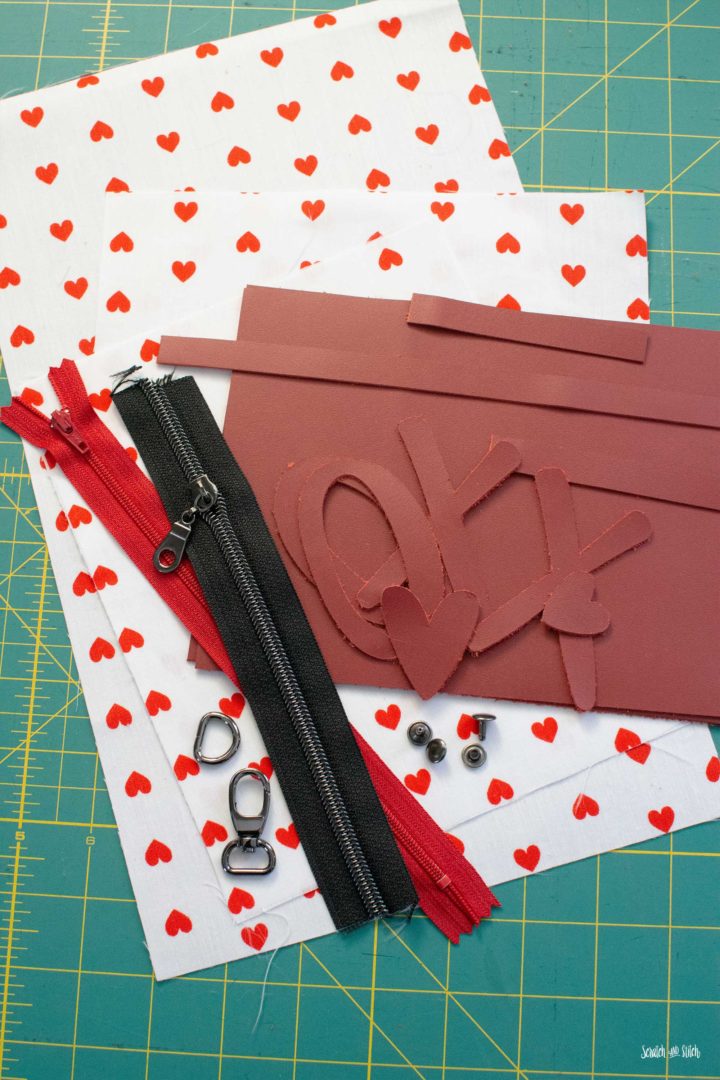
Cut the Materials
Leather Cut List
Wristlet Strap: From one 12″ x 12″ piece of leather, cut a 1/2″ strip from one side.
Front and Back: Turn the piece 90º and cut a piece 8.5″ x 11 1/2″ from one side. Cut that piece in half to 5 3/4″ X 8 1/2.”
Zip Tabs and D-Ring Tab: From the other smaller leather piece, cut two 1/2″ strips from a short end.
Graphic Details: From the remaining leather, cut the XOXO and hearts. (See below for cutting using Cricut Design Space).
Cotton Cut List
I recommend fusing the interfacing to the backside of the cotton prior to cutting. This will help avoid any shrinkage while pressing.
Cut three lining pieces:
- 8 1/4″ X 6″ – zipper window
- 8″ X 6 1/2″ – zipper pocket lining
- 8 1/4″ X 13 3/4″ – slip pocket
Paper Placement Guide
I have included a paper placement guide for the front graphics. You can cut this on your cutting machine or print it and cut it out by hand. You will need the whole rectangle cut, the XOXO, and hearts cut out from the rectangle. You do not need the inside of the Os. Using this as a guide will ensure you have even spacing on all sides and stay out of the seam allowance.
DIY Valentine’s “be mine” T-Shirt
Customize a plain t-shirt with be mine text and stripes.
Cut the Leather Front Graphics
The leather XOXO and hearts can be cut by hand or using a cutting machine. I’ve included both instructions to cut by hand and using a Cricut Maker.
Cut By Hand:
Print the PDF pattern, cut out the paper pieces, trace reversed onto the backside of the 10 1/2″ X 3″ leather piece. Cut out using a sharp razor blade or scissors.
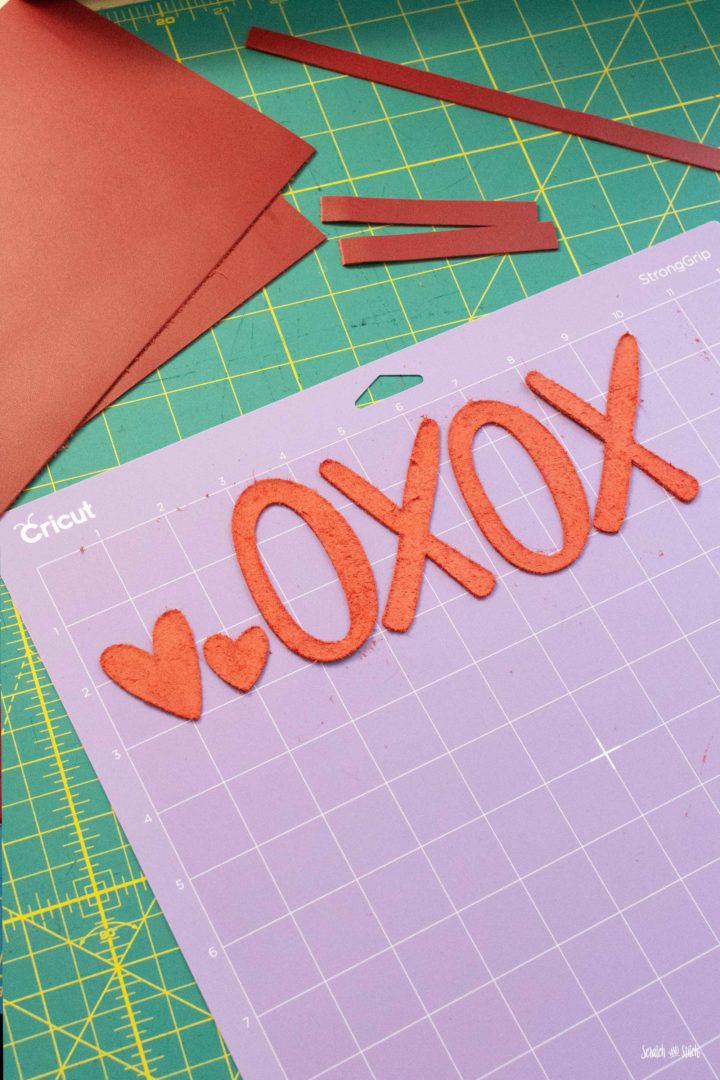
Cut Using Cricut Design Space:
Import the wristlet SVG file into a blank canvas in Cricut Design Space. Click the “Make It” button. Select the material. Prep your StrongGrip Mat and load the correct blade into the Cricut Maker. Load the mat and start cutting.
Make the Wristlet Strap
You’ll Need: 1/2″ X 12″ strip of leather, swivel clasp, rivet, double-sided tape, hole punch, rivet press or setting tool
Add a small piece of double-sided tape to the wrong side of one end of the strip. Fold the leather strip in half so 1″ hangs over, tape to hold.
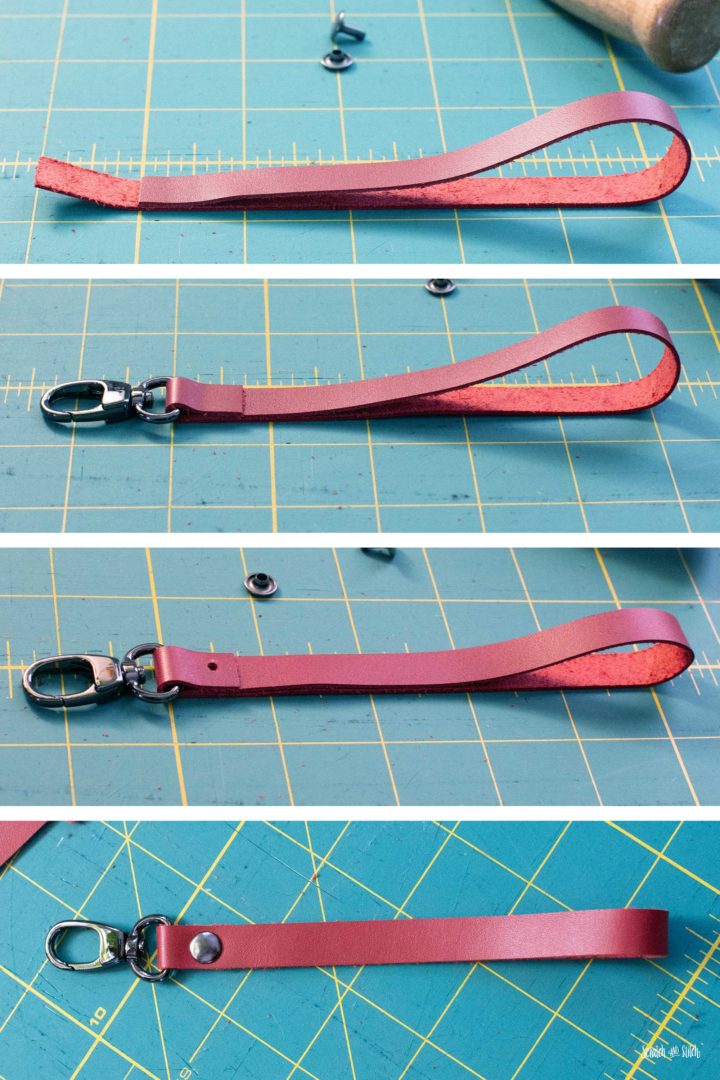
Add a small piece of double-sided tape the wrong side of the exposed end. Put the swivel clasp on the leather strip and fold the strip over, tape in place.
Punch a hole through the three layers and set the rivet. Set aside.
Adding the XOXO and Hearts
You’ll Need: 1 front leather piece, XOXO and heart pieces, paper placement guide, leather glue
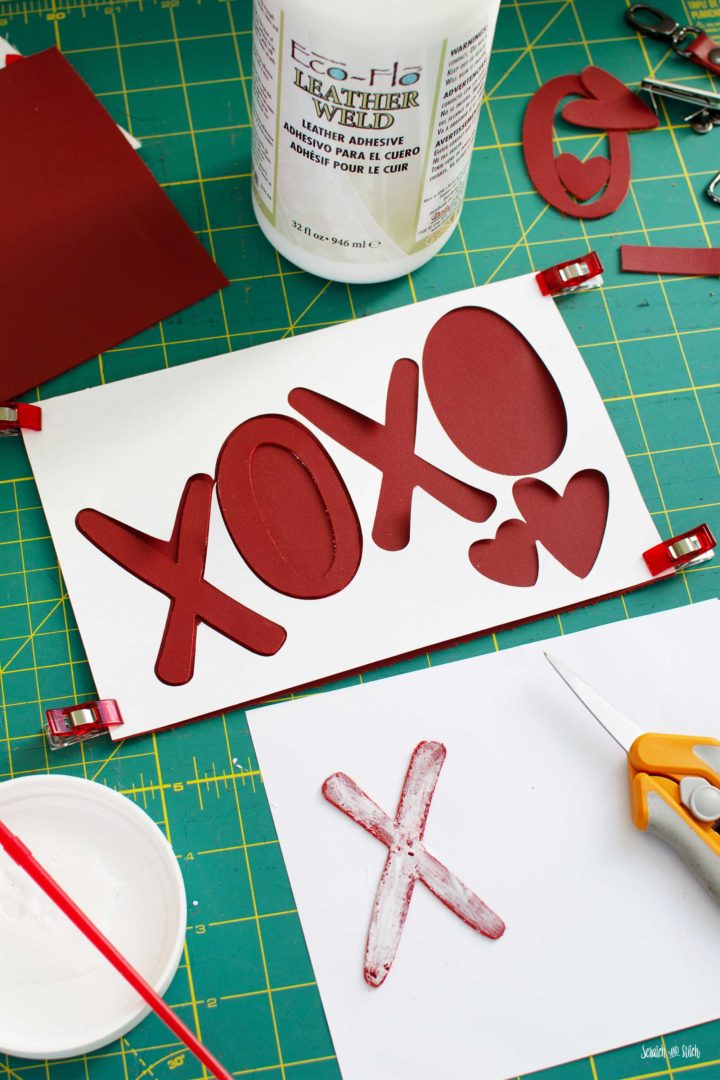
If you haven’t already, cut out the placement guide. Clip the guide onto the front leather piece. Apply glue to the backs of each of the XOXO and heart pieces then place them onto the front piece. Place a book or something heavy onto this piece and allow the glue to dry. (Wet glue may gum up your sewing machine needle or cause skipped stitches, so I recommend letting this dry overnight.)
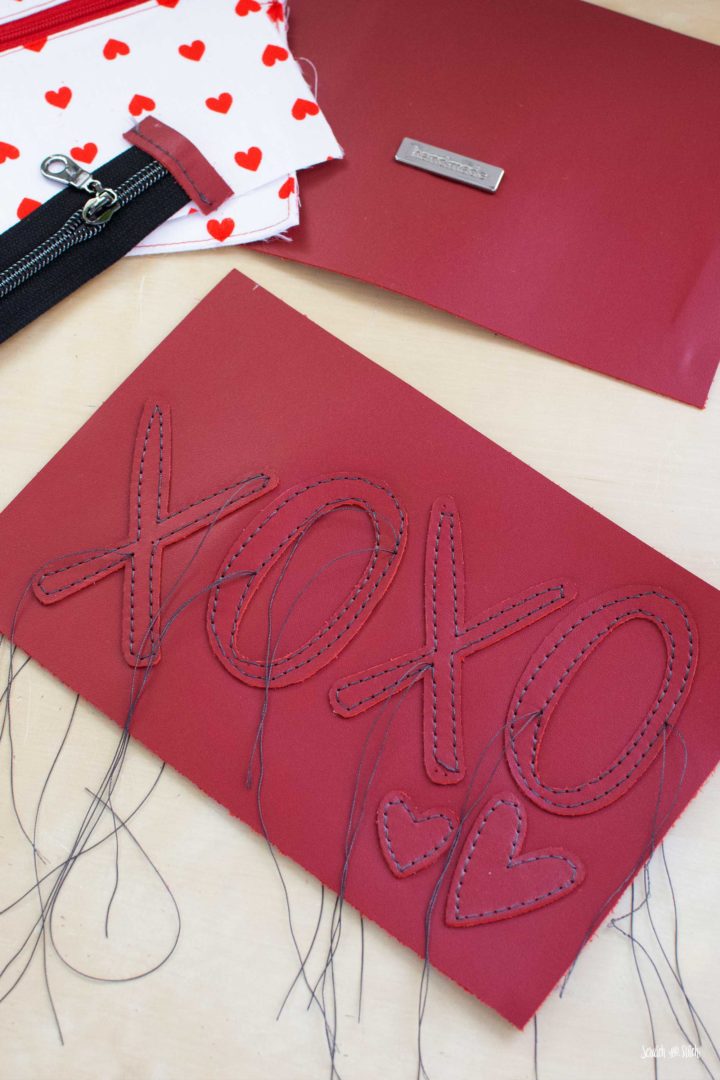
Once the glue is dried, sew around the perimeter of each of the letters and hearts. Leave extra long thread tails for tying.
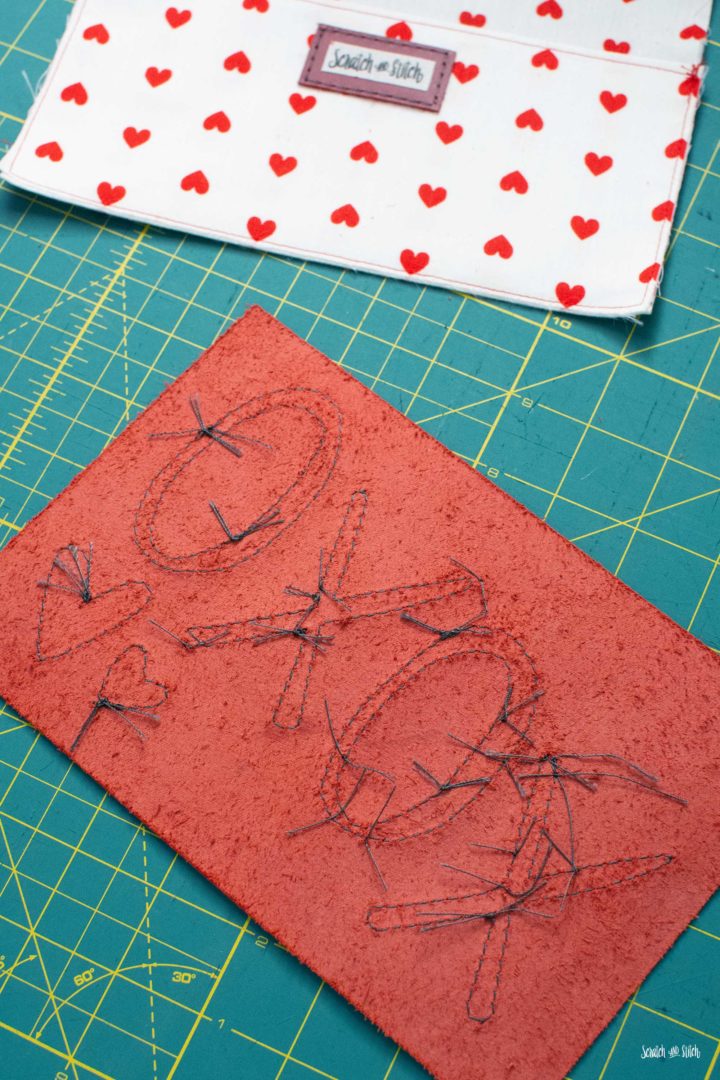
Pull the threads to the back and knot the threads. Add a dab of glue to the knots to secure.
Adding an Exterior Bag Tag (Optional)
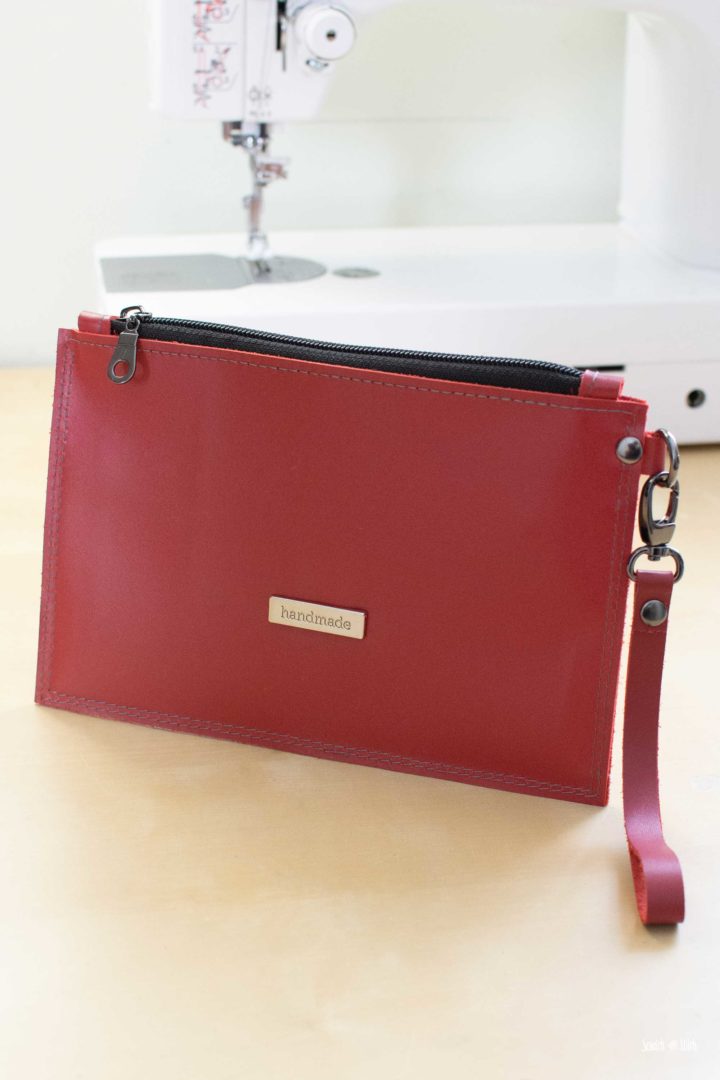
You can add a bag label to the exterior piece. I like to add a “handmade” bag tag to the back side, centered horizontally and up about 1 3/4″ from the bottom.
Make the Interior Zipper Pocket
You’ll Need: zipper window piece, zipper pocket lining piece, interior zipper, fabric marking pen, rotary cutter or scissors, double-sided tape or pins
Find the center of the zipper window piece by folding it in half and finger pressing to crease. You can add a pin or mark with a fabric pen if needed.
Onto the backside of the zipper window piece, measure 1 3/4″ down from the top, and mark a horizontal 6″ line (3″ on both sides of the center).
Mark another horizontal 6″ line 2 1/4″ down from the top.
Mark two vertical lines to create a 6″ x 1/2″ rectangle.
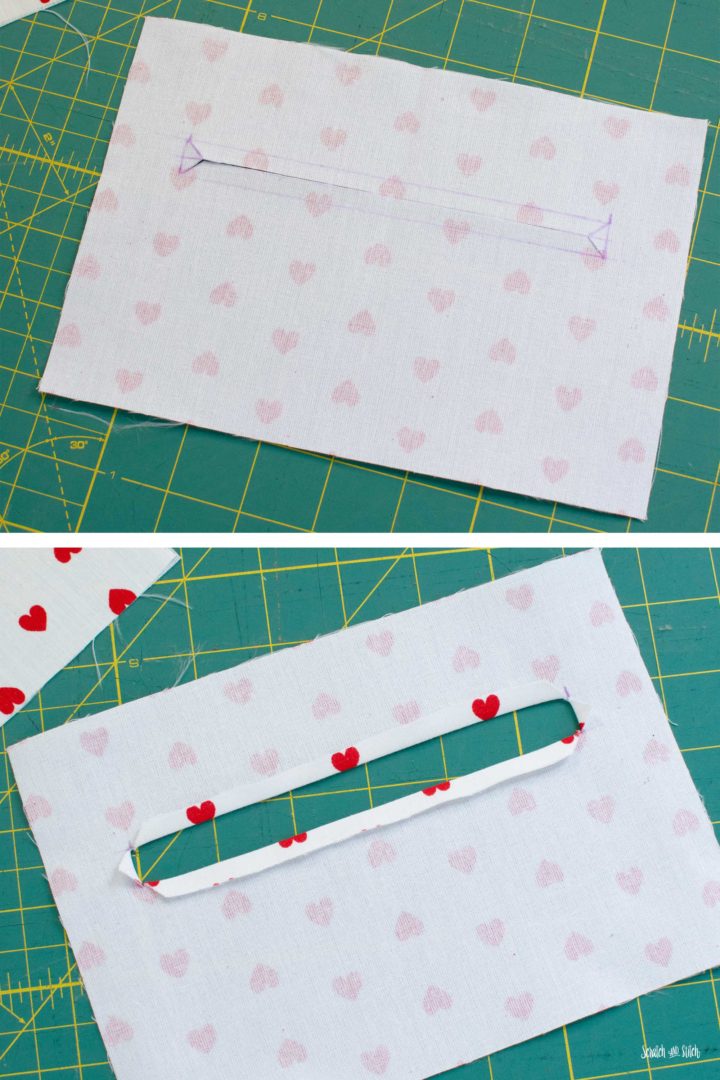
Mark a line through the center of the rectangle and angled lines to the corners. Cut on the center line and to the corners of the rectangle.
Fold the fabric back to create a window. Press to get a crisp fold.
Trim your zipper to 7″ and sew the ends closed.
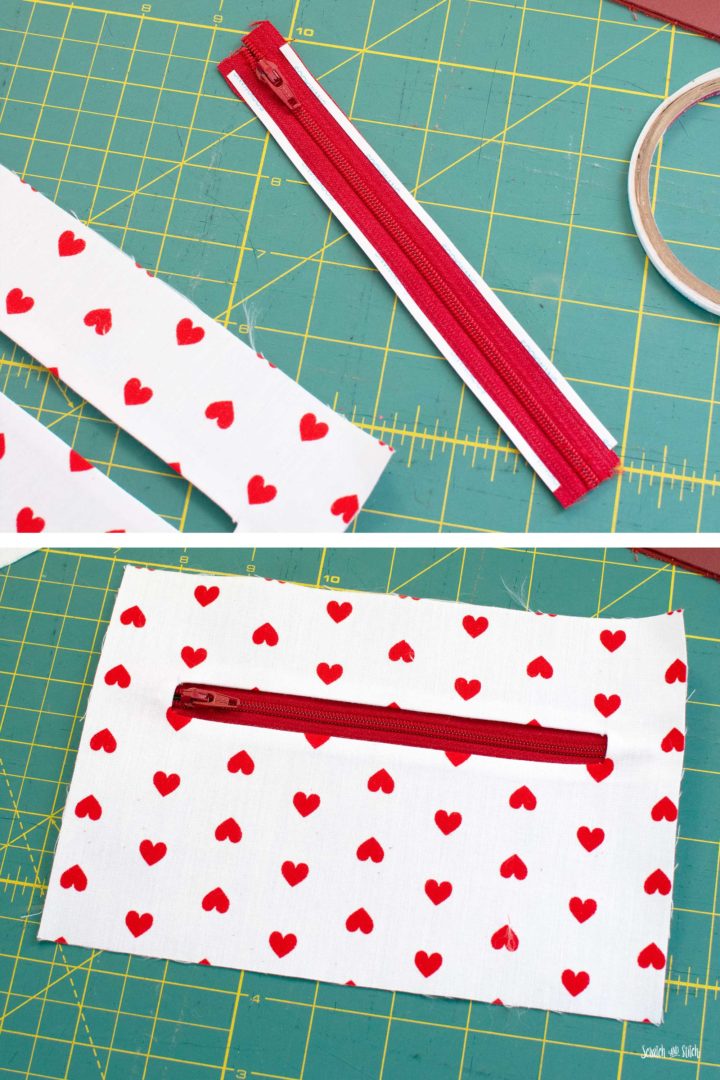
Add tape to the top and bottom edges on the right side of the zipper. Place the right side of the zipper to the wrong side of the zipper window piece, so the zipper pull shows through the window. Optionally, you can pin in place to hold.
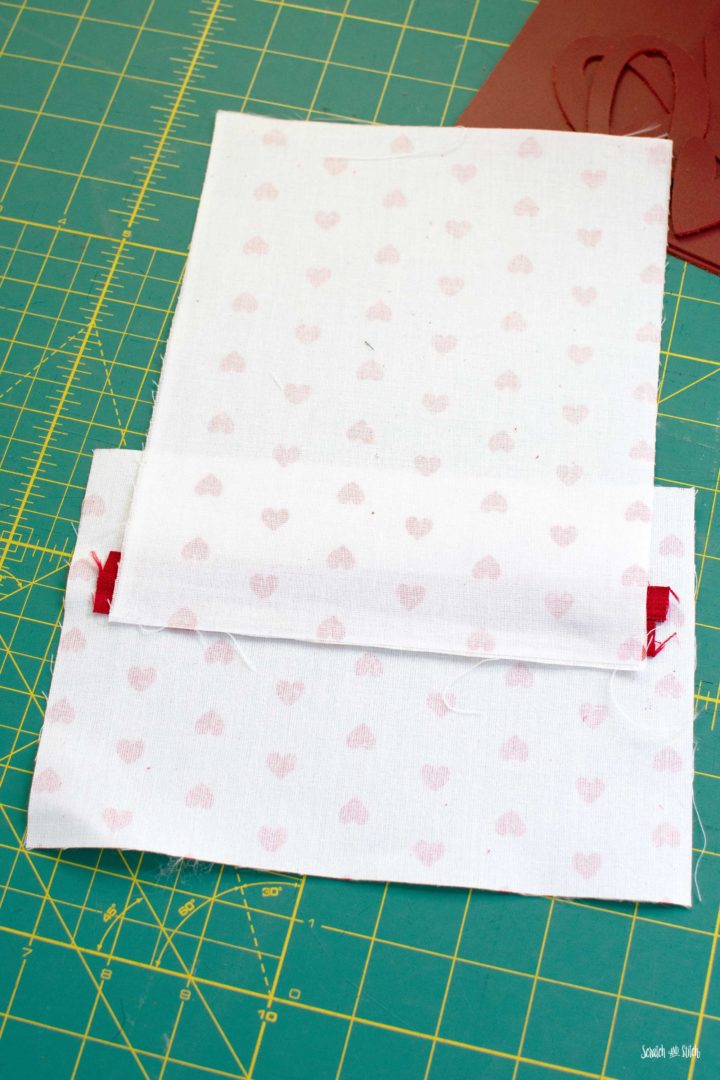
Flip over the piece and align the zipper pocket lining piece right side down to the bottom edge of the zipper tape. Pin or tape to hold.
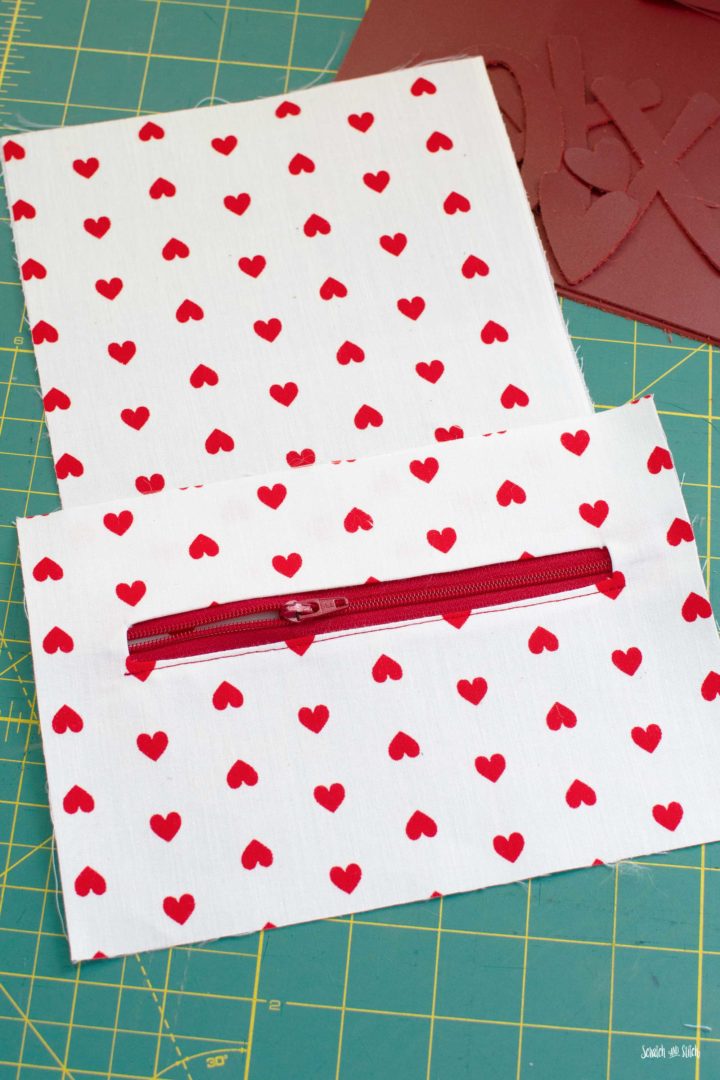
Flip over and sew along the bottom of the zipper window with an 1/8″ seam allowance. Start and end 1/8″ past the zipper window. Backstitch at the start and end, or pull the threads to the back and knot.
Fold the zipper pocket lining down and then up so the top edge is above the top of the zipper tape. The bottom of the pocket fold should not hang past the bottom of the zipper window piece. Pin or tape to hold in place.
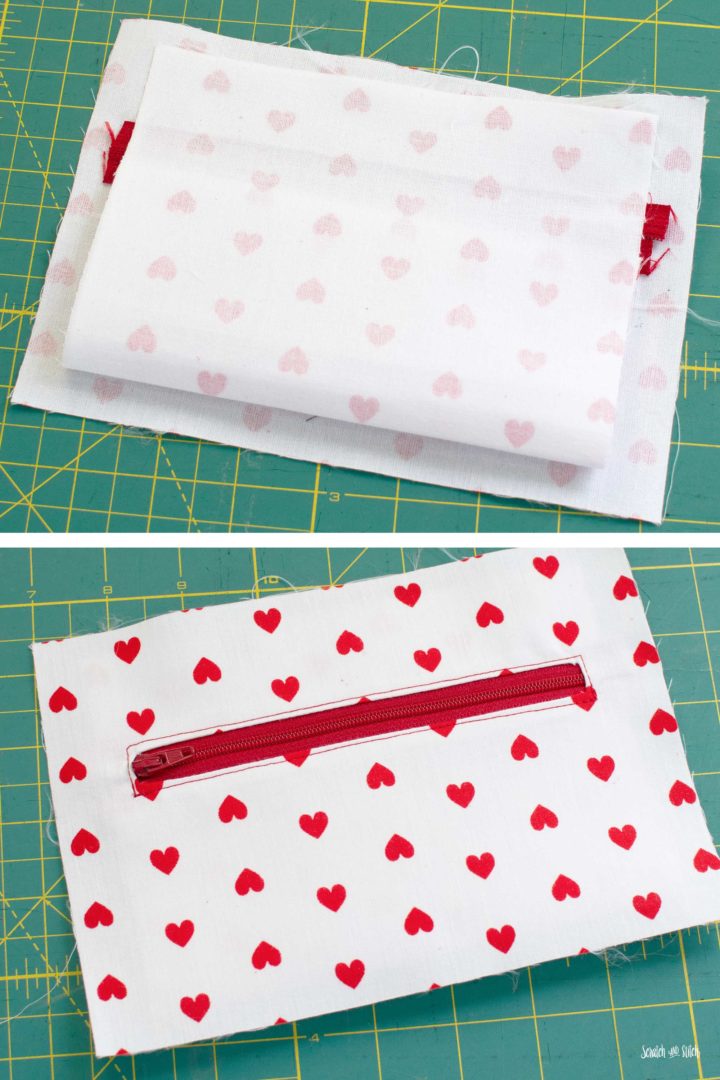
From the front, sew around the zipper window with a 1/8″ seam allowance, starting and stopping from the previous stitch lines.
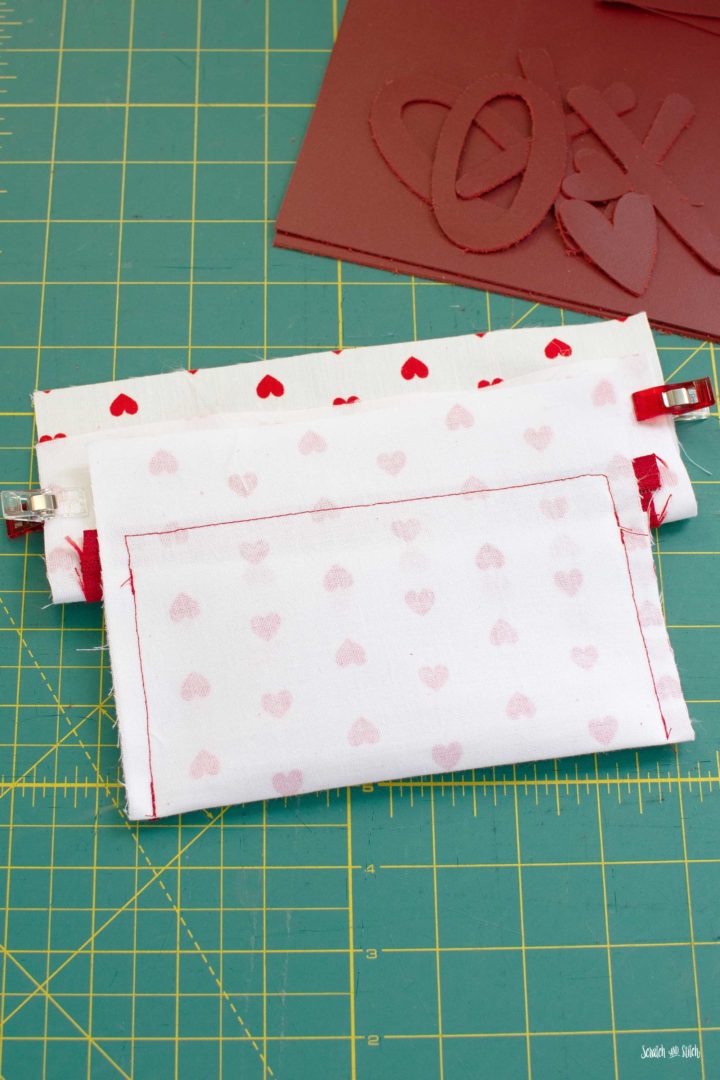
Flip the zipper window lining piece up and clip it out of the way. Starting and stopping at the previous stitch line, sew down the sides of the pocket.
DIY Valentine Candy Monsters
Make a trio of candy monsters to hold small treats and goodies for your little Valentines.

Make the Interior Slip Pocket
You’ll need: slip pocket piece, interior bag label (optional), prepared zipper pocket piece
Lay the slip pocket piece on top of the zipper pocket piece so the top edges are aligned. Fold the bottom up so the fold aligns with the bottom of the zipper pocket piece. Fold the top down to the bottom edges align. Press the slip pocket piece.
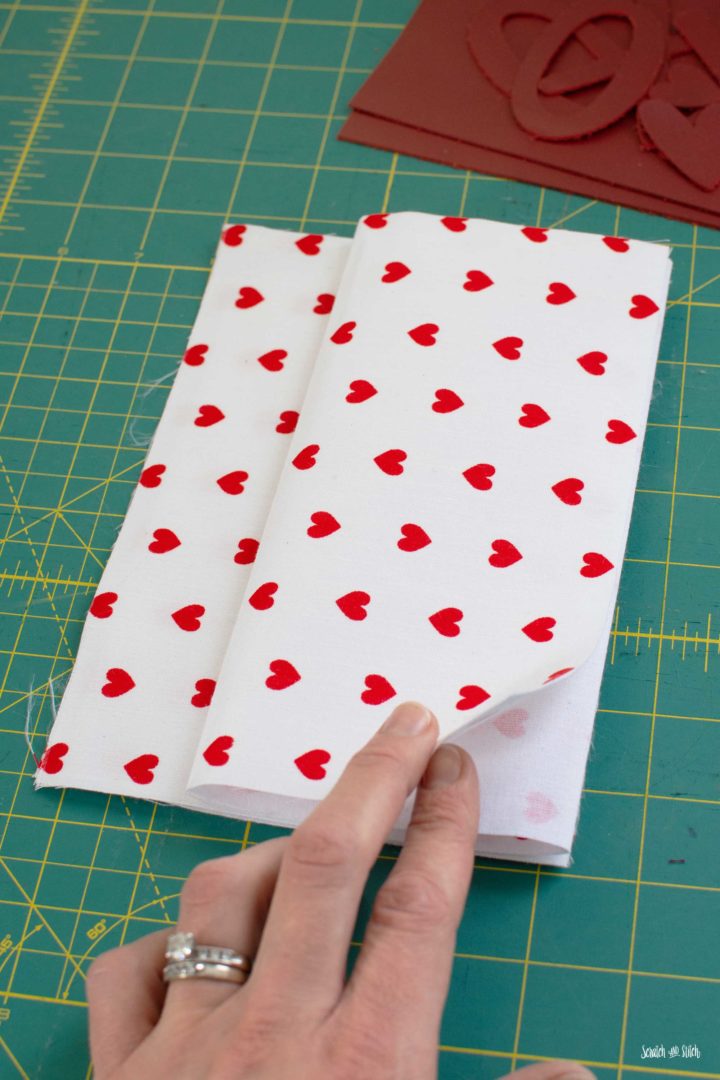
Optional: Now is the time to add an interior bag label if you’d like. I place it on the front of the slip pocket, just below the fold.
Open the slip pocket up and topstitch along the top of the pocket fold.
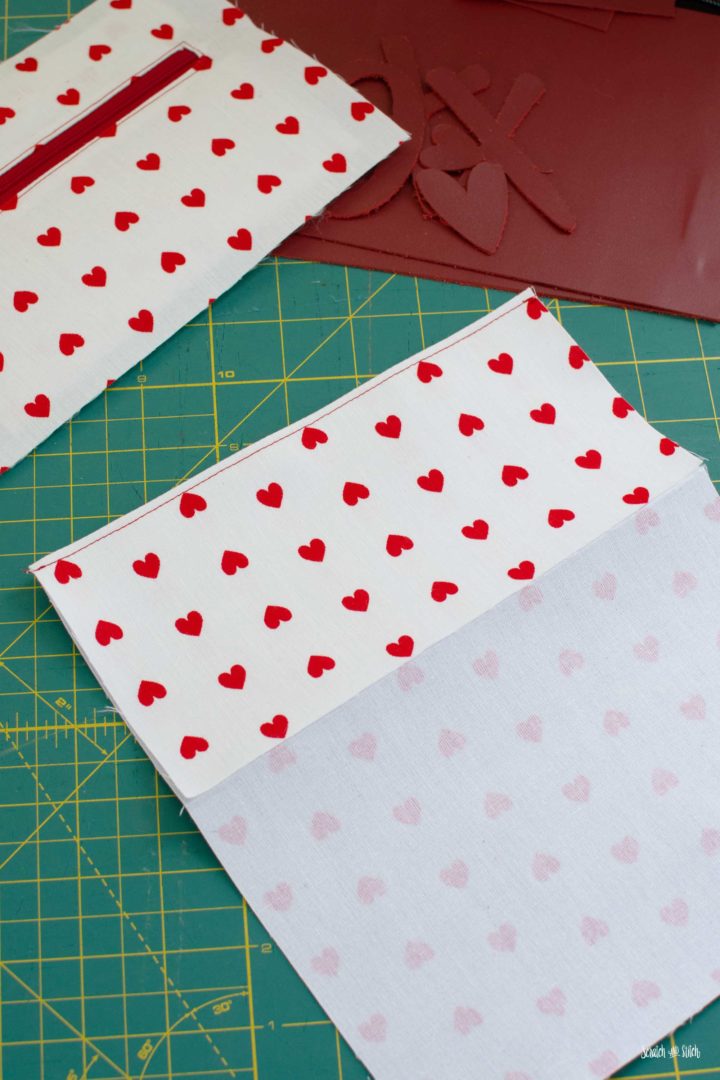
Fold the slip pocket piece closed and sew down the sides and across the bottom to seal the pocket.
Adding the Zipper Tabs
You’ll Need: 2 zipper tabs, zipper
Trim your zipper to 7 1/2″ and sew the ends closed.
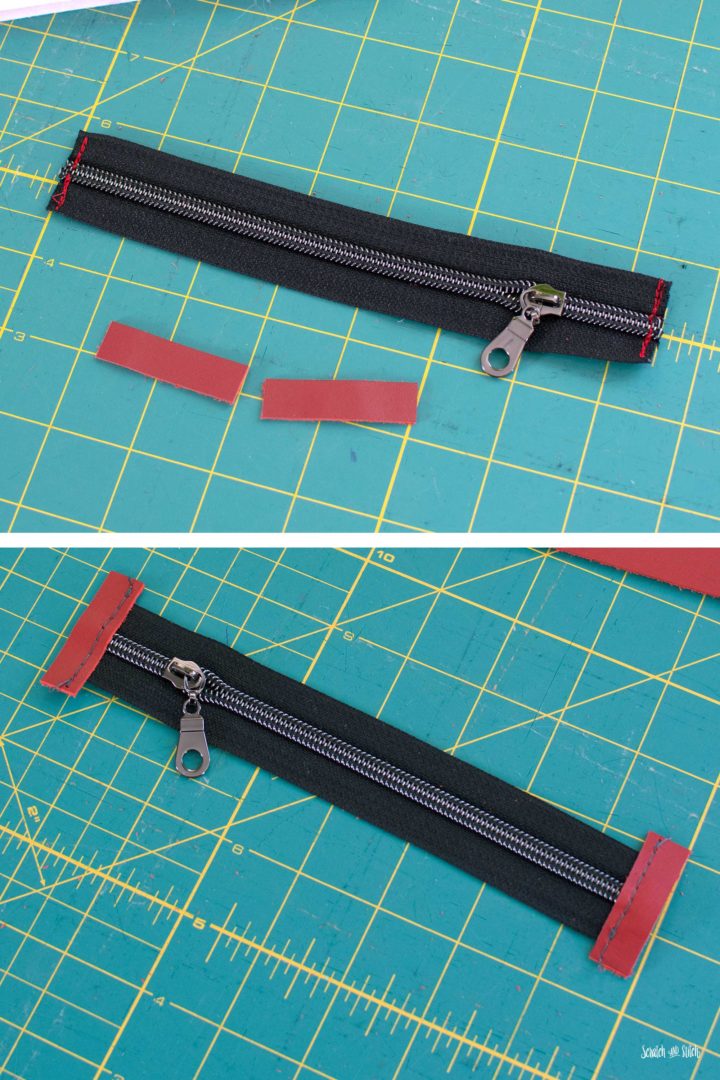
Place a zipper tab on each end so they hang over the end of the zipper about 1/8″. Clip or tape to hold. Topstitch closest to the zipper tape with a 1/8″ seam allowance. Backstitch at the start and end to secure threads. The final length including tabs should be no longer than 7 3/4″.
Teddy Bear Pattern
Make a simple plush bear with this free teddy bear sewing pattern. Includes printable PDF pattern and SVG cut file.

Final Assembly
You’ll Need: assembled leather front and back, assembled lining pieces, leather D-ring connector, D-ring, rivet
Lay the assembled zipper on top of the zipper window with the wrong side of the zipper facing the right side of the zipper pocket piece. Have the lining piece hang slightly over the edge of the zipper tape. Sew along the zipper tape with a 1/8″ seam allowance.
**Check your zipper opening direction, I prefer the zipper to open from the left. I did it backward in these photos.
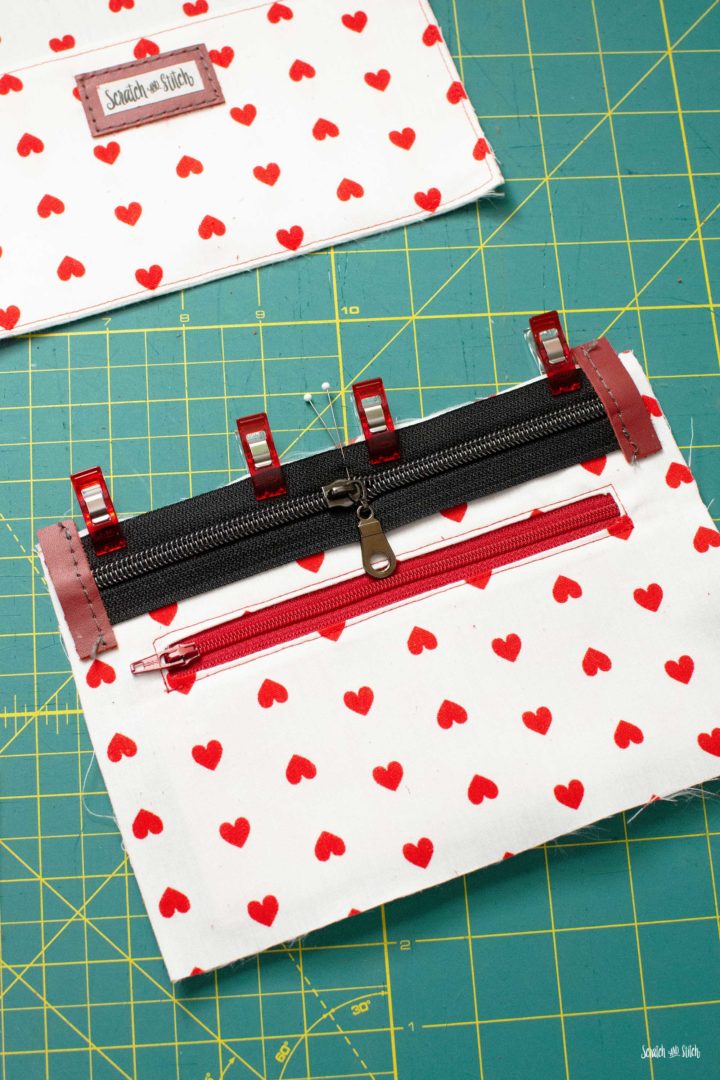
Fold the zipper tape and zipper pocket piece open and repeat with the other side. Lay the wrong side of the zipper tape to the right side of the slip pocket piece so the lining hangs slightly over the edge. Sew along the zipper tape with a 1/8″ seam allowance.
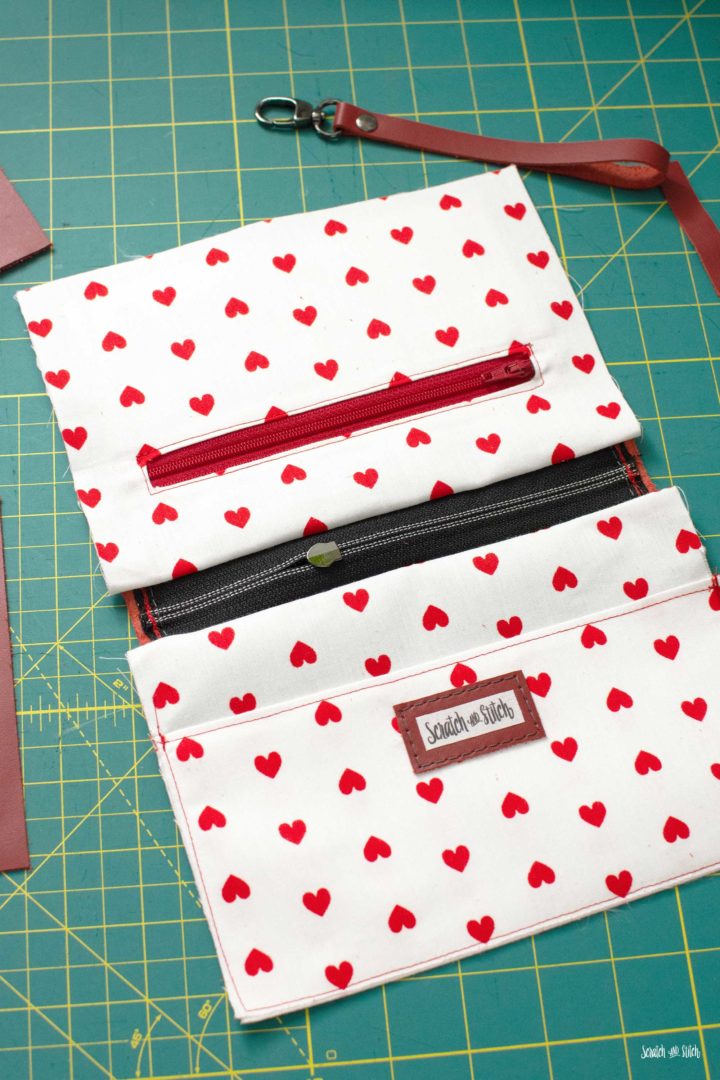
Fold the lining pieces open and finger press or press.
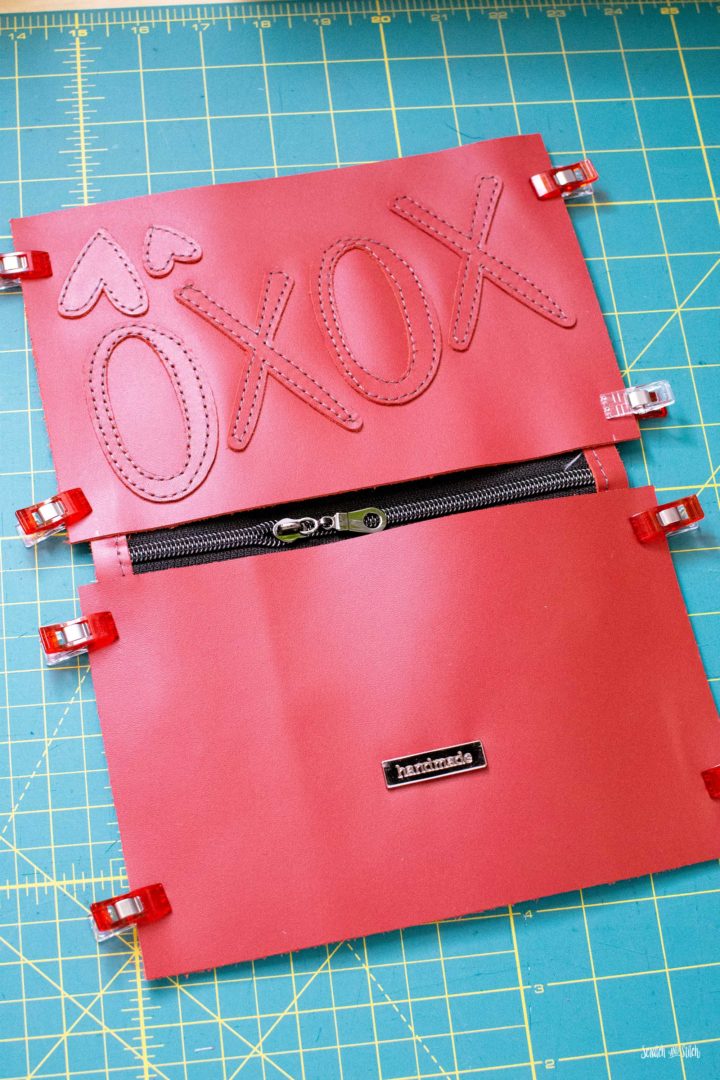
With wrong sides facing, layer the front and back pieces on top of the lining. The leather pieces should cover the previous stitching on the zipper, be centered on the zipper, and aligned to each other on the sides. Clip the layers together.
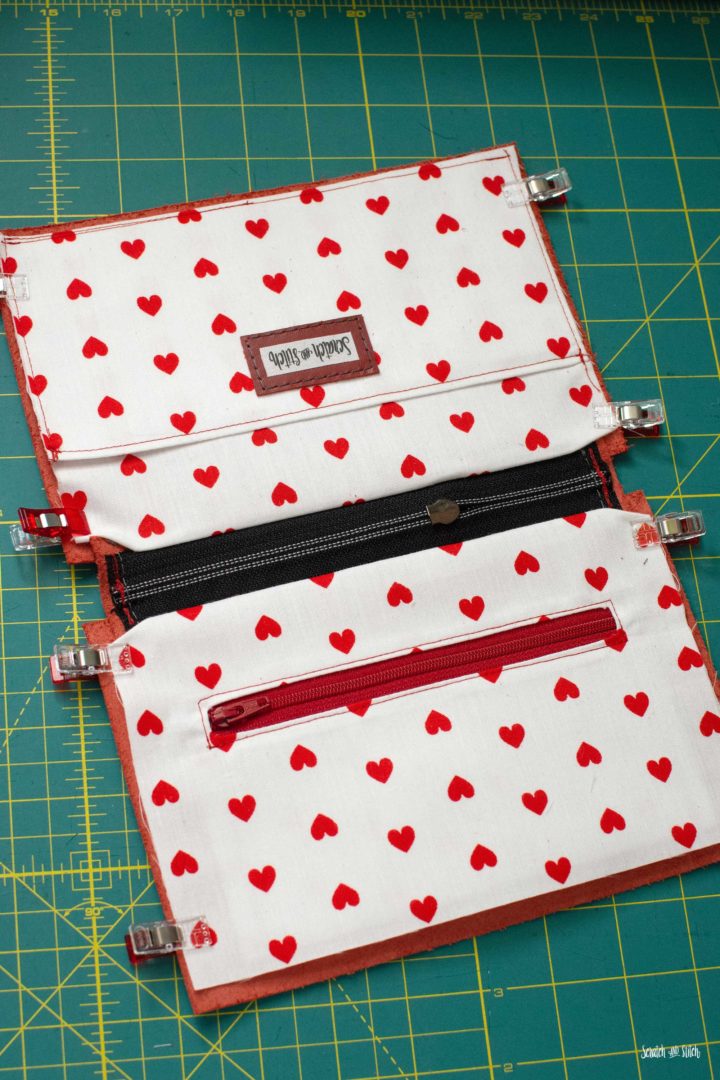
Flip everything over so the lining is on top. The space around the edges of the lining should be even on all sides.
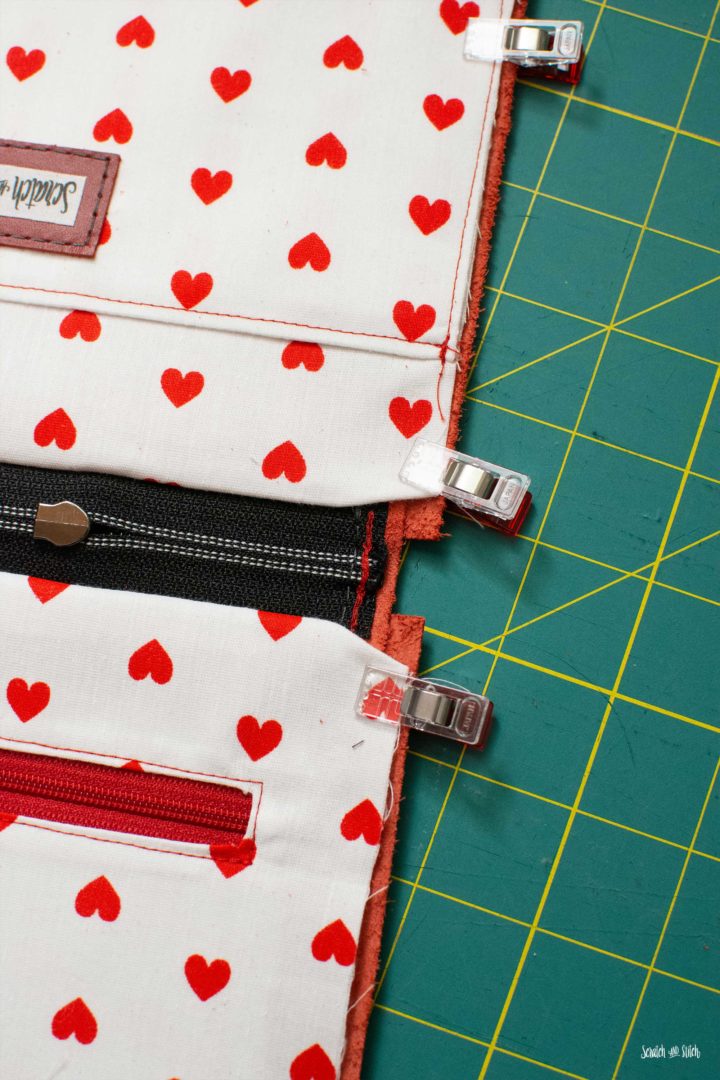
At the top corners of the lining (nearest to the zipper), fold the corners under at an angle. Clip to hold.
Flip everything over. Starting and ending 1/8″ from the top corners, do not backstitch and leave extra long thread tails, topstitch 1/8″ on both sides of the zipper. Pull the thread tails to the back and knot.
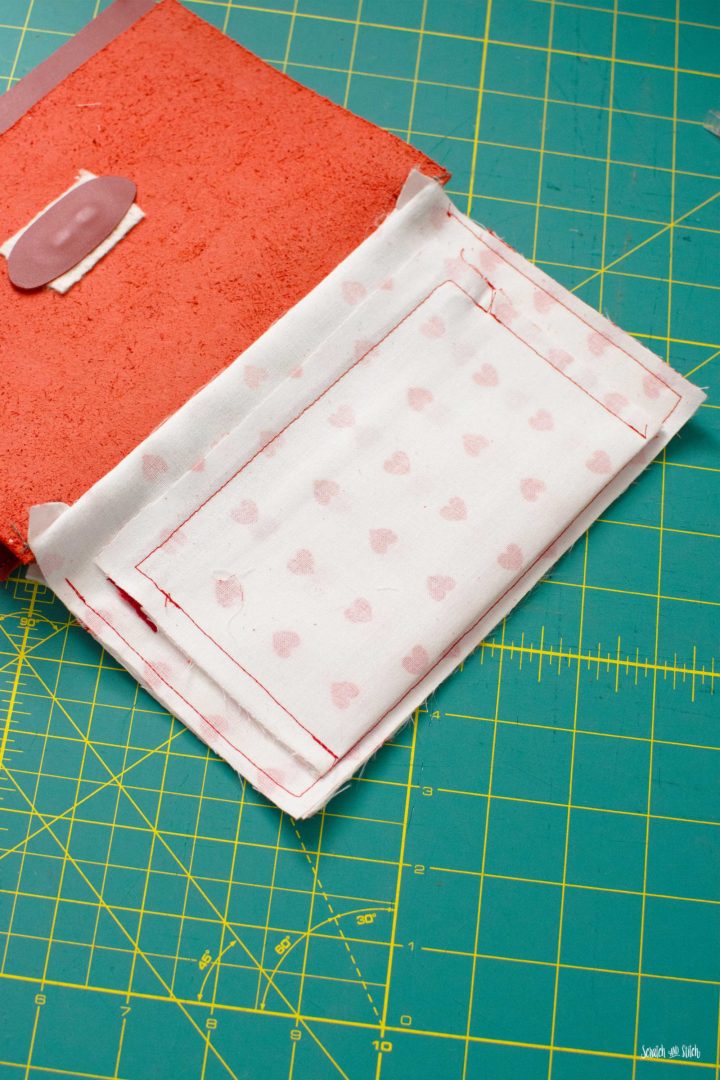
Fold the lining layers together and clip or pin to hold. Starting about 1/2″ to 3/4″ from the top, sew around the sides and bottom of the lining with a 1/4″ seam allowance. Backstitch at the start and end.
Fold the leather and lining layers together. Slip the D-ring tab with D-ring over the lining layers on one side 1/4″ from the top edge of the leather (I prefer the left side or the same side that the zipper opens). Clip or tape to hold and sew the tab to the lining.
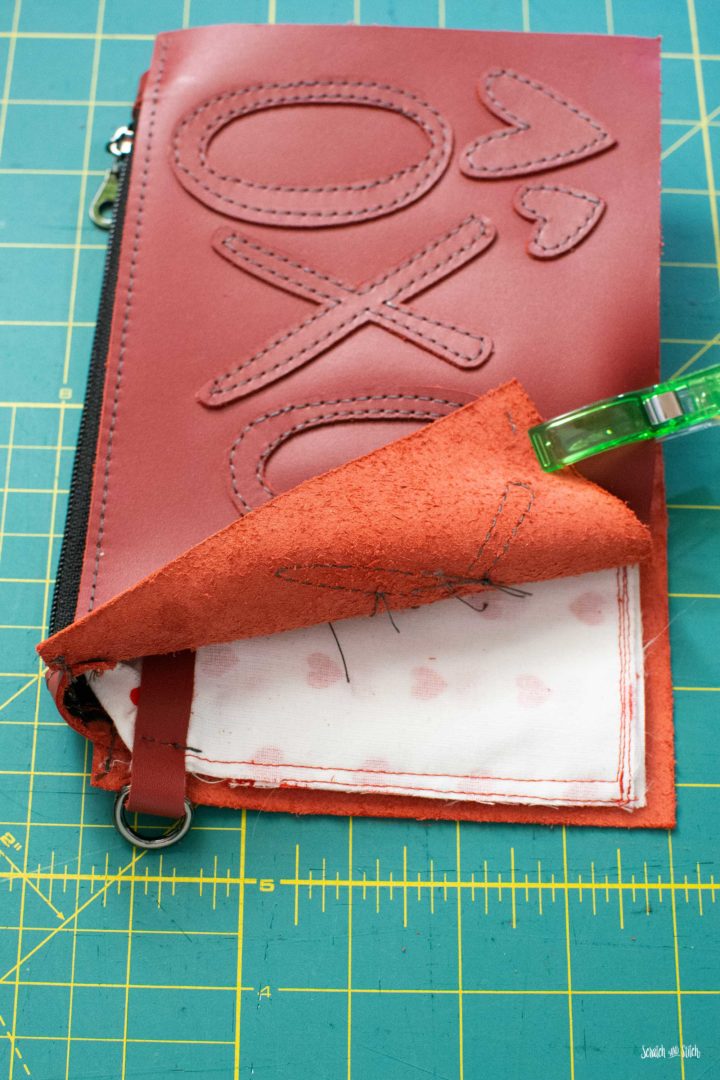
Align all sides of the leather layers and clip together. From the inside, push the lining down and to the sides as much as possible, but not to show on the outside. Clip all layers together.
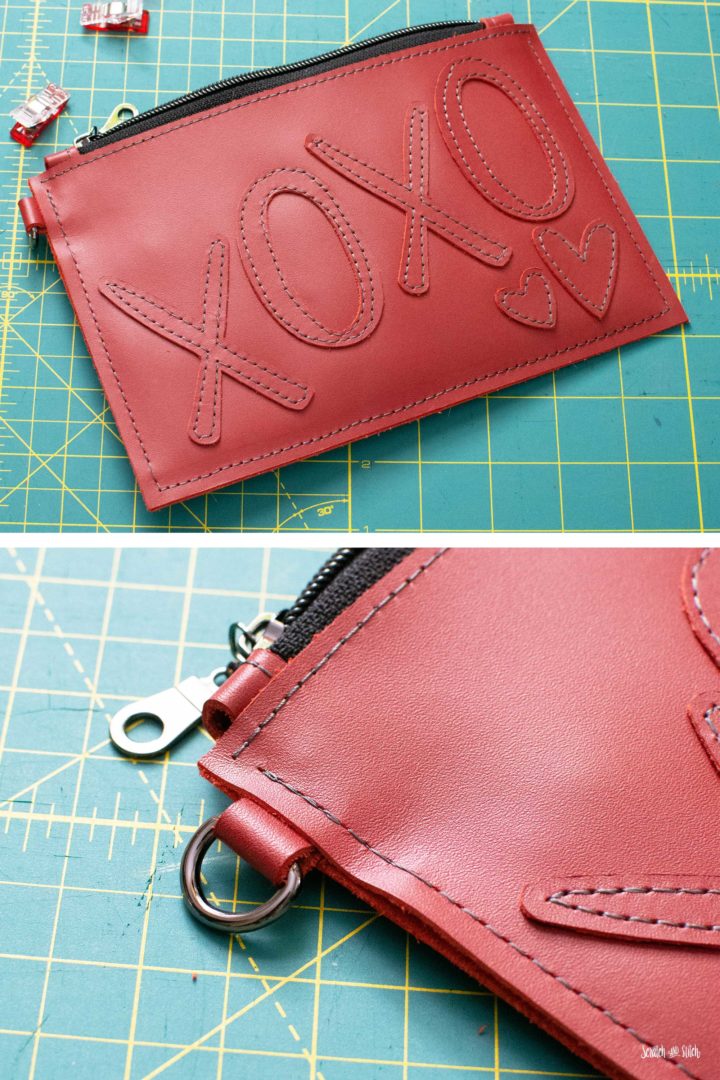
On the side without the D-ring, start sewing 1/4″ from the top and side. Leave long thread tails and do not backstitch at the start. With a 1/4″ seam allowance, sew down the side, across the bottom, and up the other side. Backstitch over the D-ring tab to secure well. Pull the thread tails in between the two layers and knot them together. Add a dab of glue to the knot to secure.
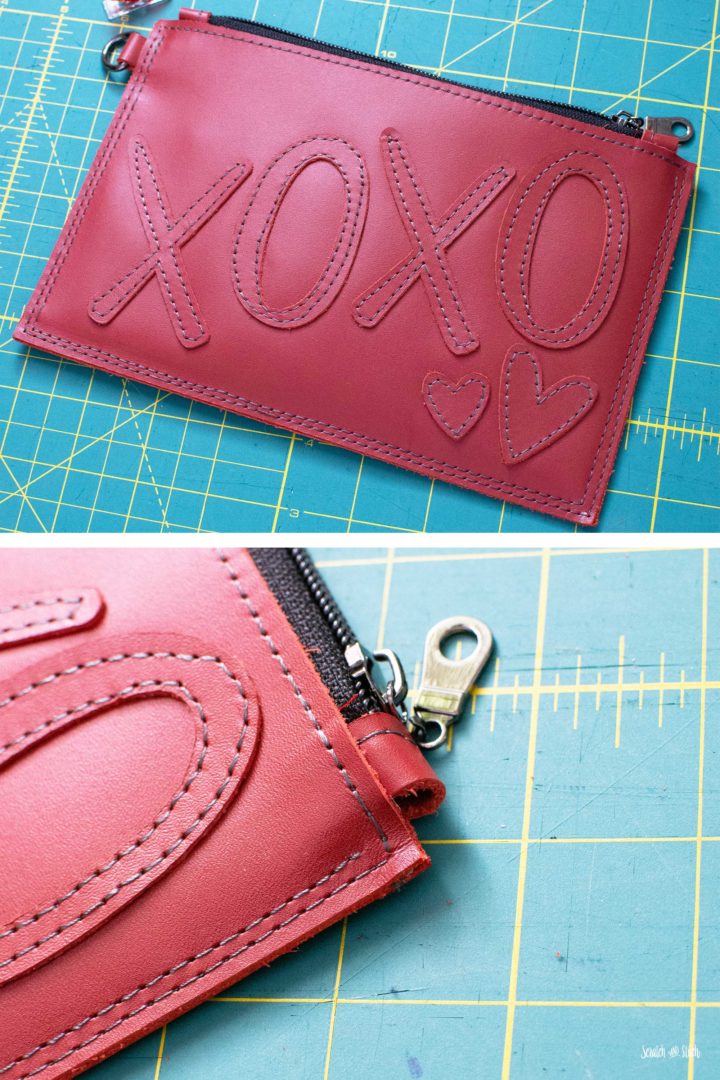
Starting at the top stitching, sew with a 1/8″ seam allowance down the side, across the bottom, and up the other side. Do not backstitch and leave long thread tails. Pull the thread tails in between the layers and knot them. Add a dab of glue to the knot.
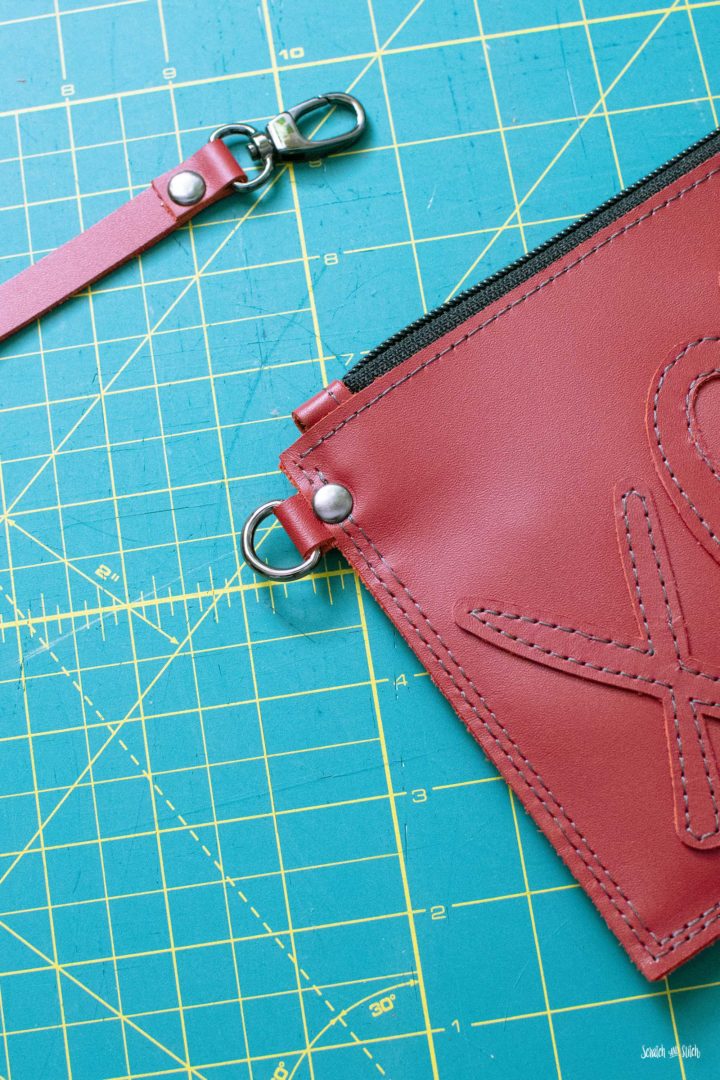
Punch a hole through all the layers at the D-ring tab and add a rivet.
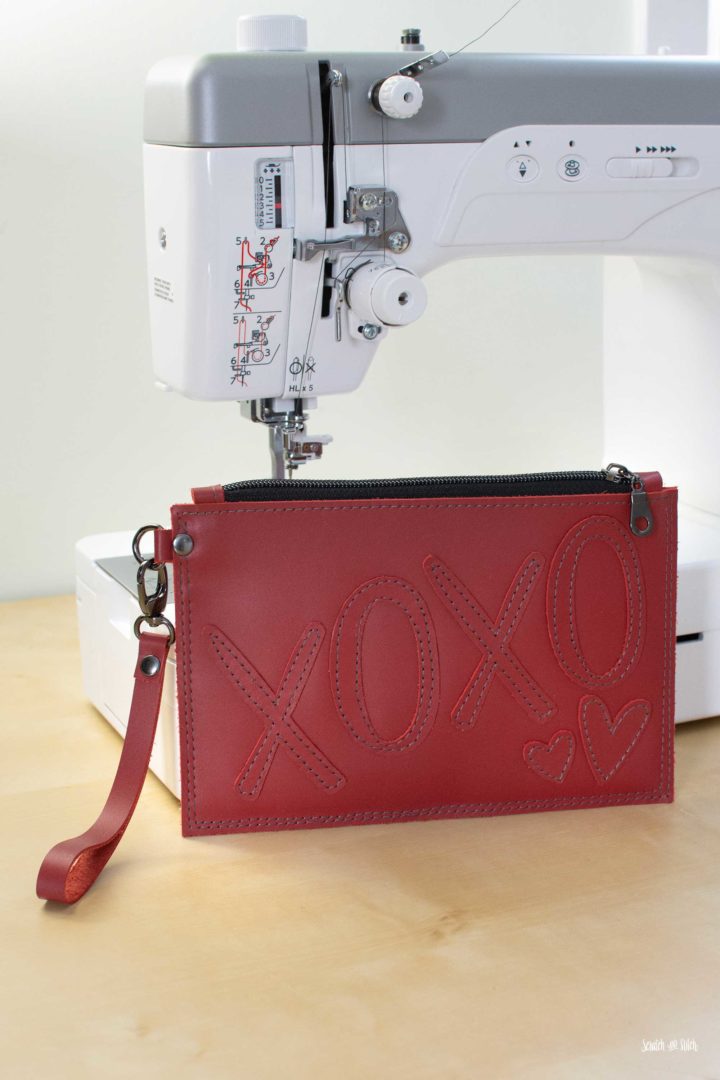
Clip on the wristlet strap and your new wristlet is ready for date night.
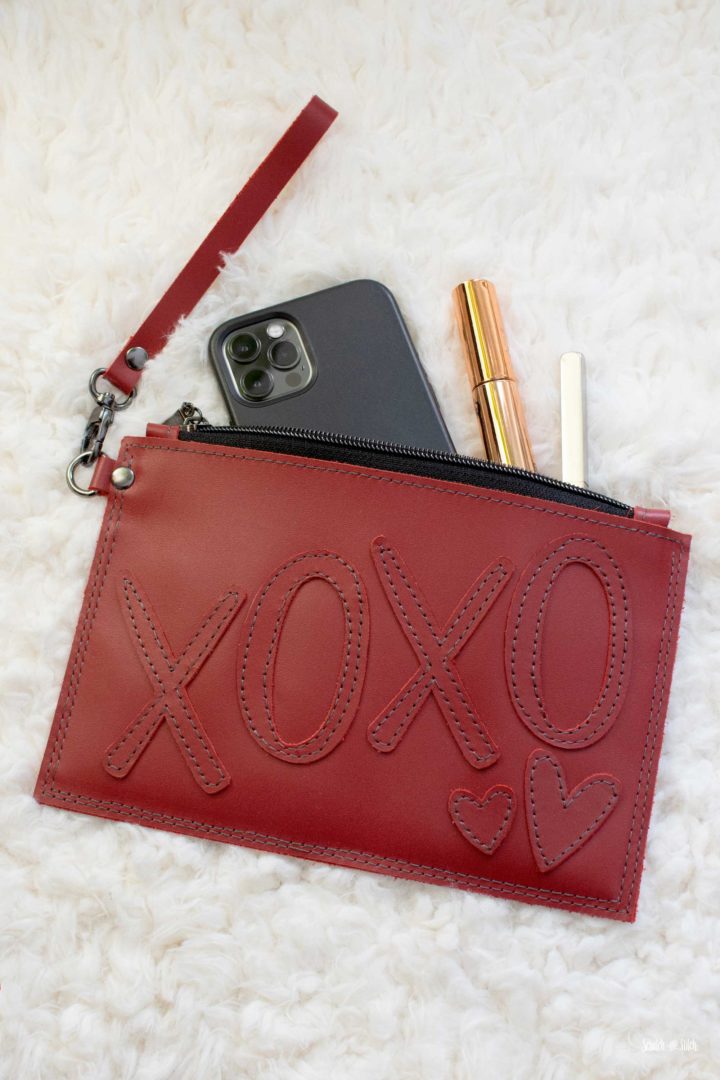
This simple wrislet comes together quickly with just one piece of leather for the exterior. The front details and contrast stitching add fun visual details. The inside has pockets to hold your things.

Did you make this leather wristlet? I would love to see your version. You can tag @scratchandstitch with your pictures on Instagram or Facebook. Or send me an email with photos.


Thank you so much! I don’t think I will have time in the next week – but there is next year to prepare for.
That’s right! I’m working on some other non-Valentine styles too. :)
You have any ideas for valentines day, for doggie toys.
Hi Sheri – Nothing specific for dogs. Though I’m thinking some heart-shaped homemade dog treats are due for our pup. :)
Muchas gracias está muy hermoso 😘
Thank you! You’re welcome :)